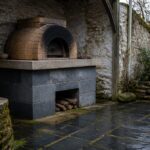
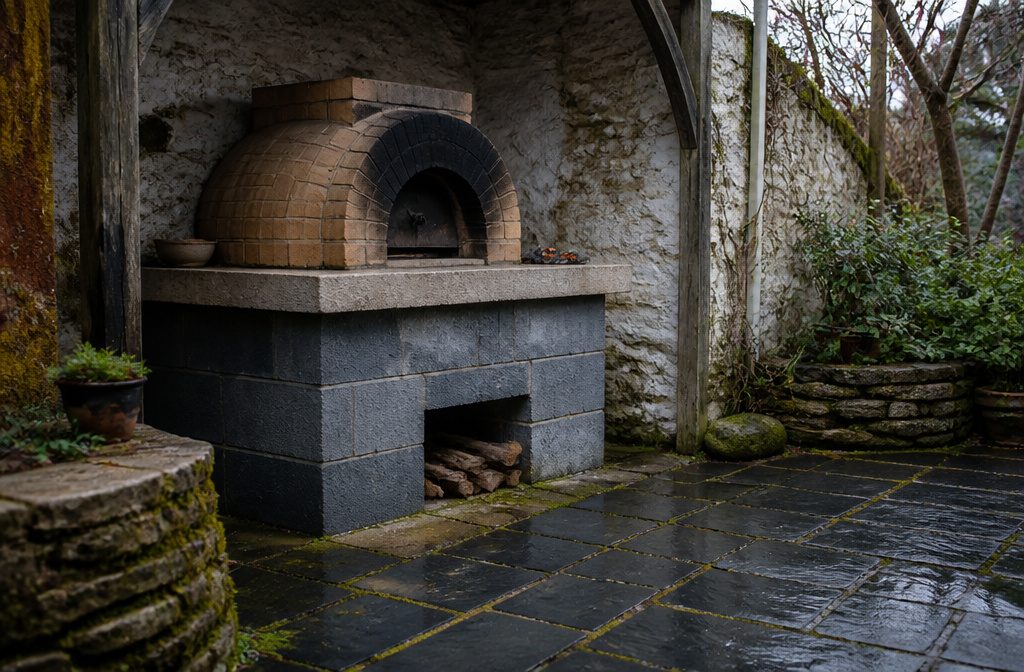
A complete brick pizza oven built on a reinforced block base takes 9 stages from foundation pour to first fire.
Most builds fail at the capstone: cast it without fiberglass rebar and you end up with a slab too heavy to lift safely or one that cracks under its own weight when you try.
The 42 inch firebrick kit handles most home cooking without adding cost over the 36 inch size, and a dome that hits 900°F at full blaze will drop to bread range once the coals are out.
1. Prepare and Pour the Pad
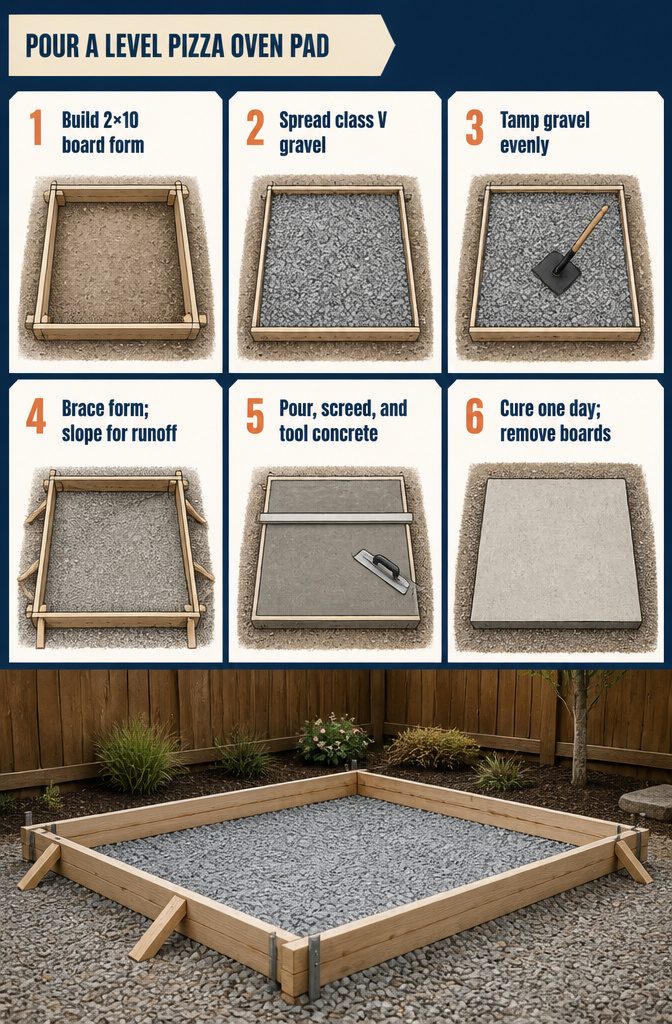
- Build the form with 2×10 boards and spread class V gravel inside, leaving eight inches clear to the top of the form for the concrete pour.
- Tamp the gravel base to compact it evenly across the form area.
- Brace the form so it holds shape under the concrete weight, and slope it slightly so water sheds off the finished pad instead of pooling.
- Pour the concrete mix into the form, then screed the surface level with the top edge of the boards.
- Once the concrete starts to set, trowel the surface smooth and tool the edges to round them.
- Let the concrete cure for a day before you pull the form boards off.
2. Cast the Capstone
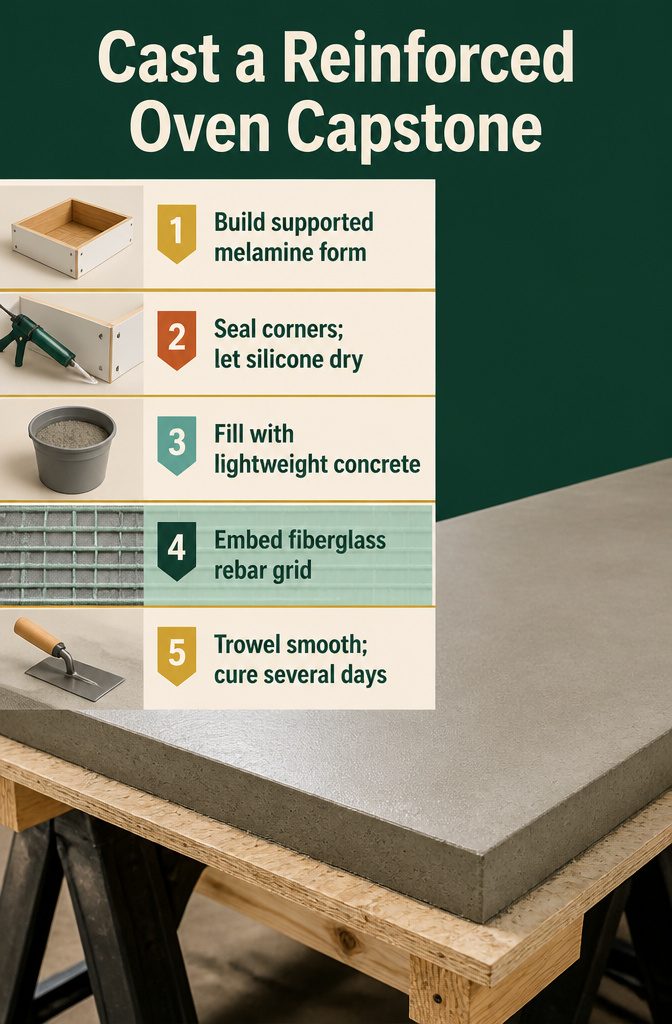
- Build a melamine form supported by sturdy sawhorses with 2×4s underneath for full support across the span.
- Run a bead of silicone along the bottom corners of the form and let it dry completely before you pour. This seals the seams so concrete doesn’t leak out.
- Fill the form with lightweight countertop concrete mix. The capstone sits three inches thick, so measure carefully before you fill.
- Add a fiberglass rebar grid to reinforce the slab. Fiberglass keeps the weight down and avoids rust stains that steel rebar can leave behind.
We used fiberglass rebar here to keep the weight down and avoid rust stains.
That choice matters more than it sounds: a capstone that weighs less is easier to move and set, and the stain risk with steel is real.
- Set the rebar grid into the concrete and press it down so it sits embedded, not floating on top.
- When the concrete begins to harden, trowel the surface smooth and tool the corners to finish the edges cleanly.
- Let the capstone cure for several days before you strip the form. Lightweight concrete needs time to reach full strength, and pulling the form too early risks chipping or cracking.
3. Build and Fill the Block Base
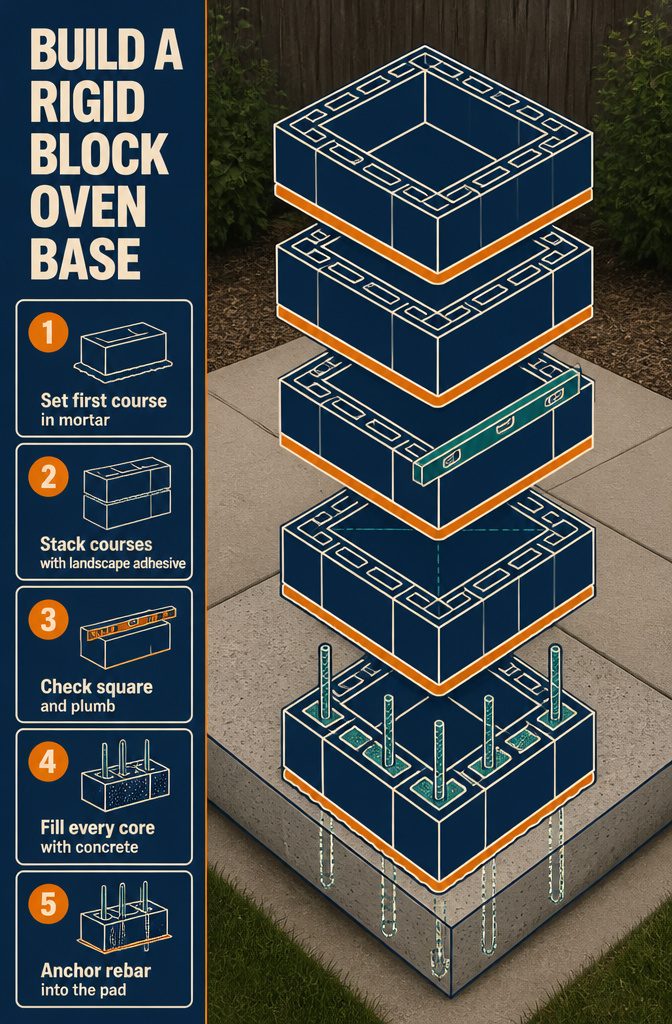
- Lay the first course of concrete blocks in mortar where the pad slopes. Start by marking the base outline on the pad, then set the blocks. If your pad isn’t perfectly level, mortar lets you build up the low side so the base sits flat. On a level pad, skip the mortar and use landscape adhesive for every course instead.
- Stack the remaining courses with landscape adhesive, checking square and plumb as you go. A 4-foot level catches drift before it compounds, and measuring diagonals confirms the footprint hasn’t racked. I tighten alignment at every second course rather than waiting until the stack is eight blocks tall and past the point where small adjustments work.
- Once the adhesive dries, fill all block cores with concrete mix and rebar. Drill the pad for rebar before setting the first course so the rods anchor into the slab. When you pour the fill, the rebar locks the base to the pad and ties the courses into a single rigid structure instead of a stack that could shift under the oven’s weight.
4. Set the Capstone and Perimeter
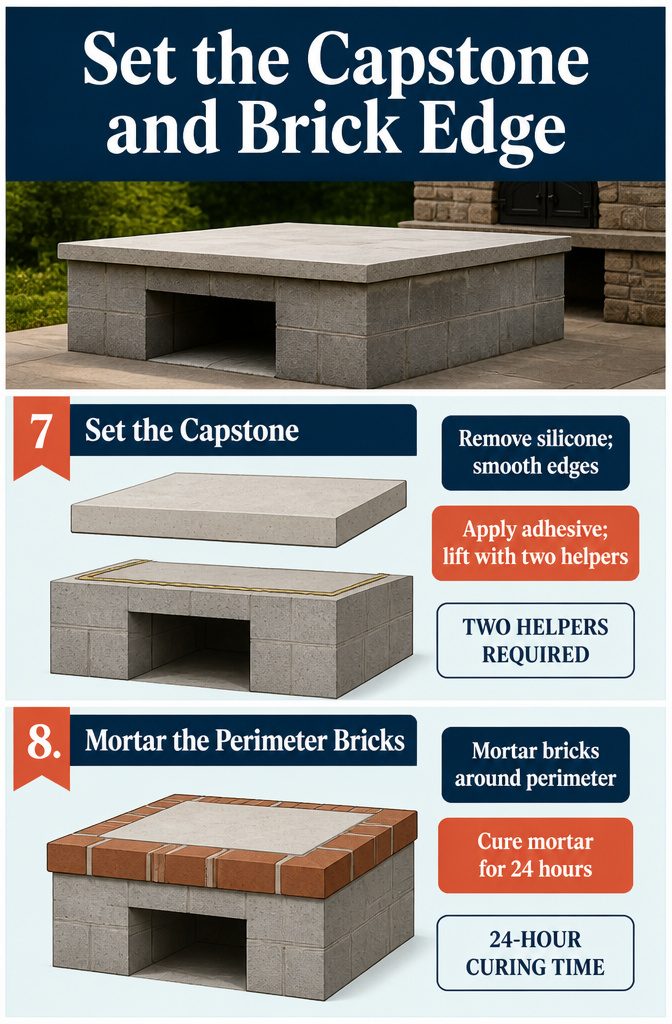
7. Set the Capstone
Pull the form off the capstone you cast earlier. Remove any leftover silicone from the edges and smooth sharp spots with a rub block.
Apply landscape adhesive to the top of the block base, then lift the capstone into place. This piece weighs enough that you need at least two other people to move it safely.
8. Mortar the Perimeter Bricks
Set bricks around the outer edge of the capstone, filling joints with a grout bag as you go.
If you don’t want the hollow ends of the bricks showing, cut face pieces from extra bricks and mortar them over the open cores. Let the mortar cure for 24 hours before you light the first fire.
5. Build the Oven Floor
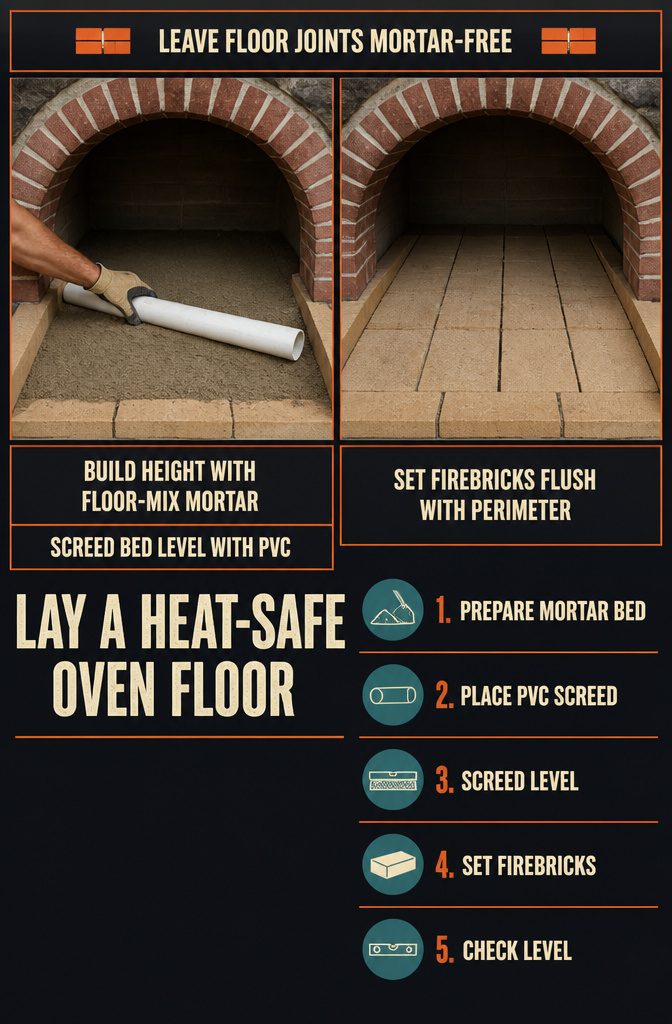
- Raise the firebricks to match the perimeter height by setting them on a thick-bed floor-mix mortar. Floor mix is a dry-pack concrete used for screeding flat surfaces, and here it acts as a stable base beneath the actual firebrick floor. Lay down enough mortar to bring the bricks flush with the top of the perimeter ring, then use a length of PVC pipe as a screed guide. Drag the pipe across the mortar bed to level it at the height you need before setting the firebricks on top.
- Set the base firebricks in refractory mortar and level them flush with the perimeter. Use a straightedge or level across the tops to check alignment as you go. Mortar is traditionally left out between the floor firebricks themselves—they sit edge to edge without a joint—so the oven floor can expand and contract with heat without cracking. Only the mortar beneath holds them in place.
6. Make and Install the Arch Form
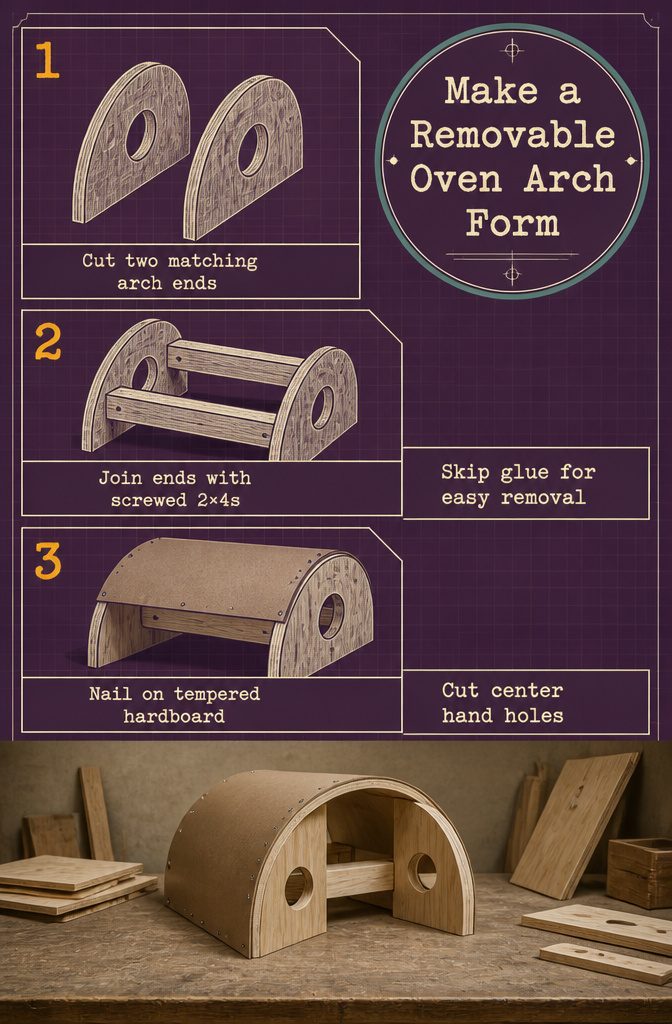
Make and Install the Arch Form
- Cut the arch ends from scrap plywood or MDF to the profile shown in your design. These two identical pieces define the oven opening and support the curved skin while you work, so accuracy here matters more than the material itself.
- Connect the arch ends with straight 2×4s running between them. Use construction screws without glue. The form needs to hold its shape under the weight of the arch bricks, but it also needs to come apart once the mortar sets. Glue makes removal much harder.
- Attach tempered hardboard to the frame with roofing nails. This creates the curved surface the firebricks will rest against. Before you fasten the skin completely, cut a large hole in the center of each arch end. Those holes give you something to grip when you pull the form out from inside the cured oven, and they reduce suction against the mortar.
7. Build the Firebrick Arch and Veneer
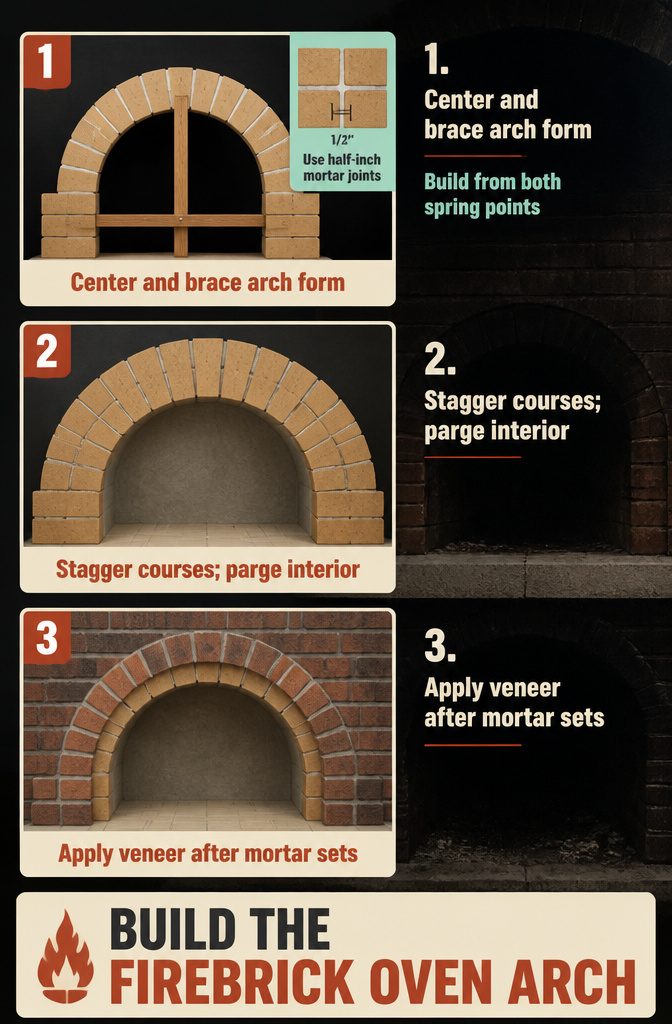
- Center the arch form inside the opening and brace it so it cannot shift. Lay the first course of firebricks on both sides at once using refractory mortar, working from the spring point toward the crown. Plan the joint spacing so you avoid cutting bricks — a half-inch joint is standard, but you can widen or tighten slightly to land on whole bricks at the top.
- Add successive courses, staggering the joints between them so no vertical seam lines up with the one below. Once the arch is complete, parge the interior with a thin coat of refractory mortar to seal any gaps. Leave the firebricks around the flue area loose for now; you will set them permanently after the flue goes in.
- Apply the outer brick veneer once the refractory mortar sets. Butter each brick with standard masonry mortar, press it into place, and fill gaps with a grout bag. When the mortar begins to firm, tool the joints with a striking iron to match the rest of the base.
8. Set the Flue and Finish the Rear
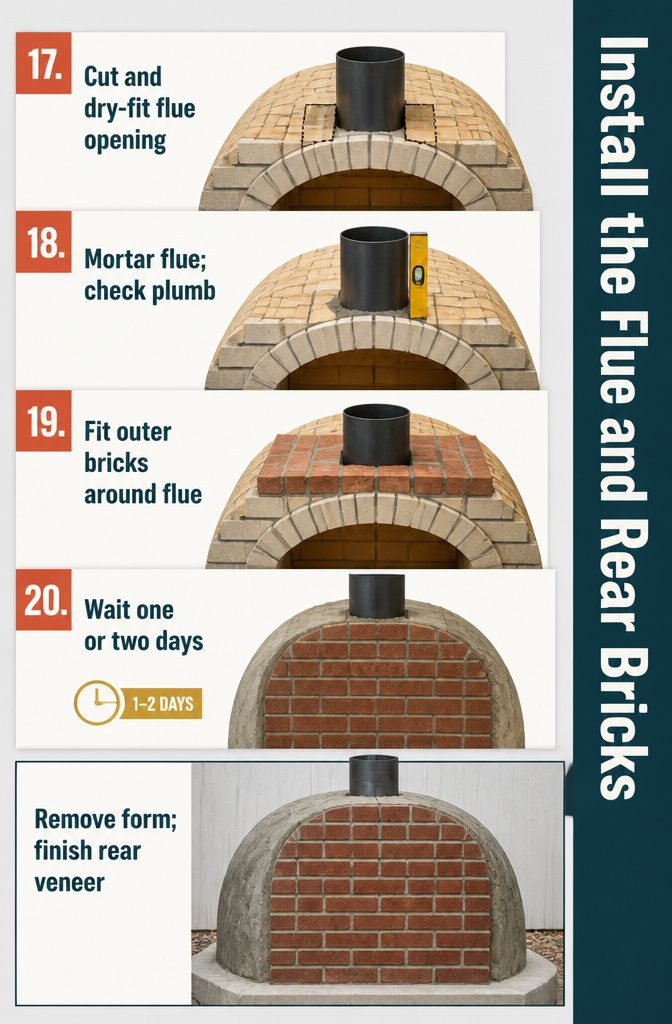
17. Cut the flue opening
The top front firebricks need matching cutouts to seat the flue.
Mark the outline of the flue opening on each brick, then score and cut them with a masonry blade. Set those bricks dry first to check fit, then mortar them in place.
18. Mortar the flue in place
Once the mortar under the cut firebricks is firm enough to hold position, butter the base of the flue and press it into the opening.
Check plumb with a level. Let the mortar set before continuing.
19. Fit the remaining outer bricks
With the flue anchored, set the rest of the outer-course bricks around it.
You’ll need to cut several to fit the curve and the flue housing. Work mortar into any gaps as you go.
20. Remove the arch form and veneer
Wait a full day or two before pulling the wooden arch form. Avoid prying or hammering, which can crack fresh joints.
Fill the back wall with firebrick and parge coat, then veneer the flue and rear face with brick slices. Stagger corner joints and cap the top with mortar sloped to shed water.
9. Apply the Base Veneer
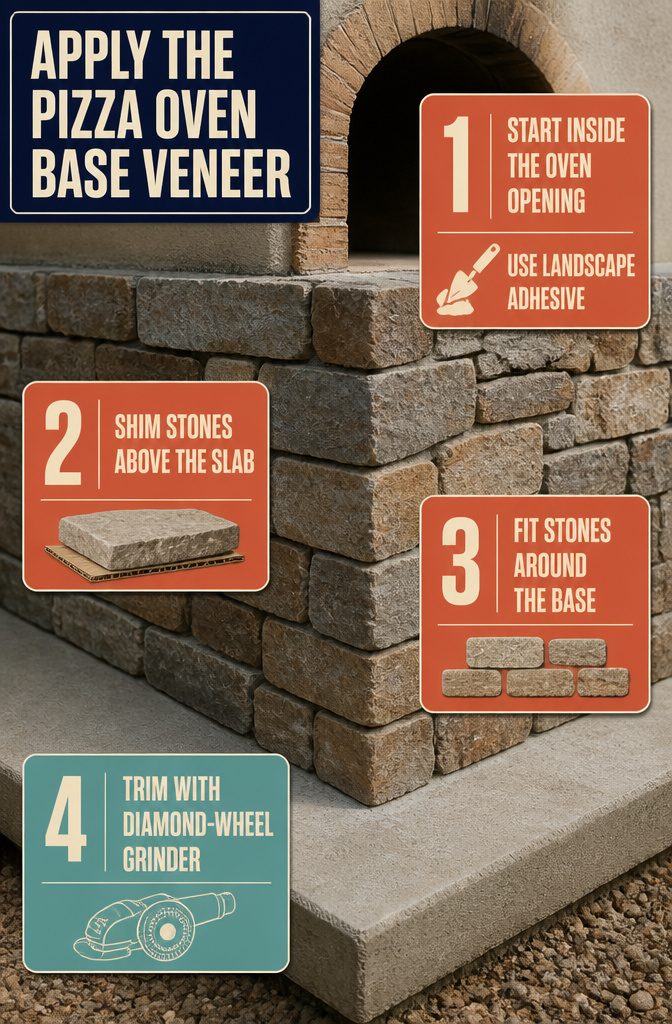
- Start the veneer inside the oven opening and work outward with cultured-stone veneer and landscape adhesive. The inside-to-outside approach gives you a clean edge where it matters most, and wrapping the front corner keeps the joint tight.
- Place cardboard shims under each stone to hold it slightly above the slab. That gap lets water drain instead of pooling behind the veneer, which matters more than it looks like it should in an outdoor structure.
- Work around the whole base once the front corner is set. The adhesive grabs fast, so fit each stone before you press it down.
- Trim stones at corners and along the top edge with an angle grinder fitted with a diamond wheel. Cultured stone cuts cleaner than natural stone, but you still need the diamond wheel to keep the edge from chipping. Dry-fit first, mark the cut line, then grind.
Materials and Design Choices
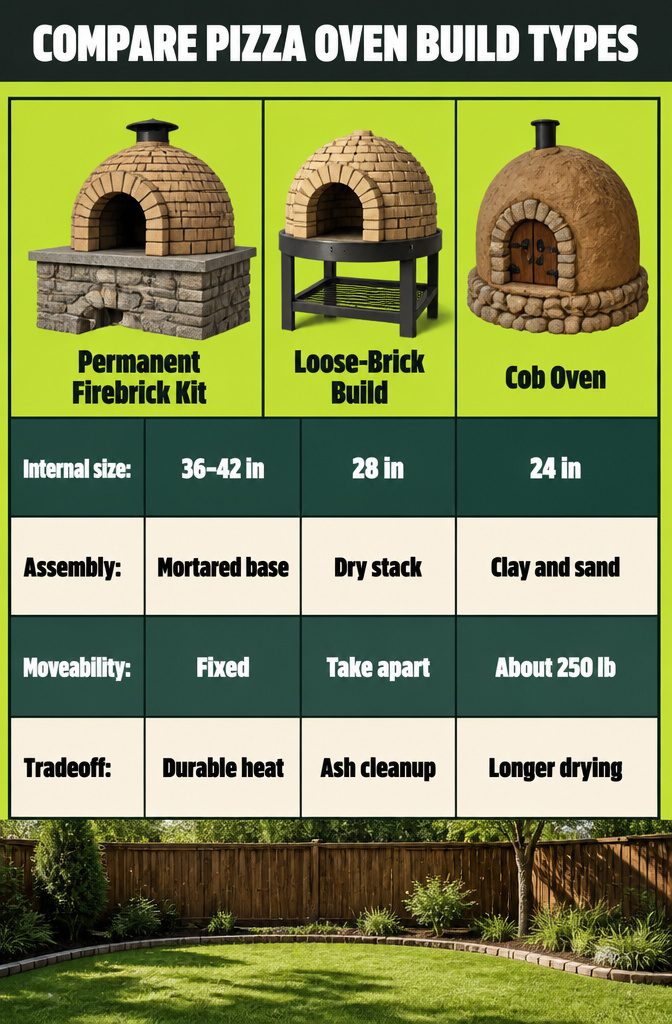
The first choice is whether you’re building something permanent or something you can take apart and move.
Firebrick kits in 36 and 42 inch internal diameters show up most often in permanent installs—these use high-temp mortar and sit on a masonry base you won’t be disassembling.
The 42 inch size handles most home cooking without adding much cost over the smaller one. A 105 cm kit (just over 41 inches) lands in the same range and works for larger gatherings.
Loose brick builds skip the mortar. One approach stacks 70 firebricks into a 28 inch structure supported by six pieces of angle and flat steel, which ran about $75 for the steel and $125 for the bricks at $1.75 each.
Another stacks regular pavers without cutting or fastening anything, though ash cleanup on a gravel base becomes a problem you’ll solve later.
The firebrick version holds heat better and the steel keeps the roof from sagging, but you’re still working without mortar, so the oven can be taken down if you move.
Cob ovens run smaller and lighter. A 24 inch finished diameter with a 12 inch cooking area and 14 inch dome weighs around 250 pounds and takes two 5-gallon buckets of clay and sand mix.
The door for that size should measure 8.75 inches high—63 percent of the dome height, which researchers found in traditional ovens across different regions.
Cob insulates well and costs less than firebrick, but the build takes longer and you’re working with wet material that needs time to dry between layers.
Foundation, Site, and Support
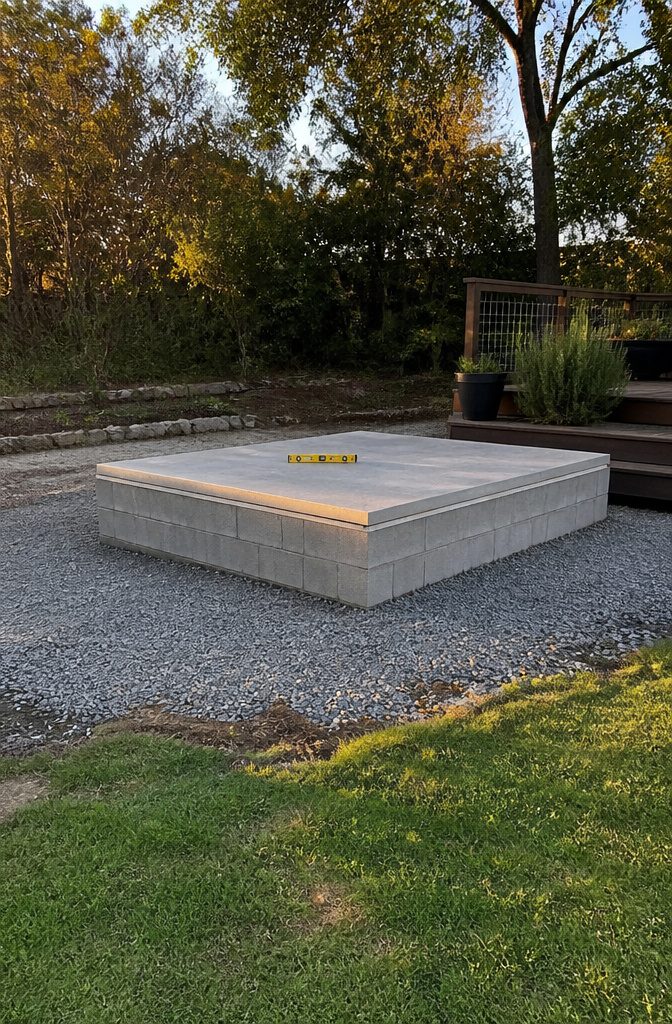
The oven starts with a foundation built to handle weight without shifting. Source 1 calls for reinforced concrete foundations supporting a suspended concrete slab, especially over soft ground where consultation with a builder may be needed.
The base itself can be built from brick, interlocking concrete blocks, or cinder blocks filled with concrete and steel.
One rebuild added a fifth course of blocks instead of the usual four when the first attempt sat too close to a deck and needed relocating.
Location matters as much as the structure beneath it. A firm, flat, open area away from flammables and foot traffic keeps the oven safe and usable.
Uneven ground calls for a crushed gravel base layer to level the first course of brick; a spirit level confirms the surface is horizontal before any further work goes up.
Working height comes next—the foundation should hold the oven floor at a comfortable standing position.
Between that floor and the base material, four to six inches of insulation keeps heat in the oven instead of bleeding into masonry or scorching wood supports.
Heat and Material Safety
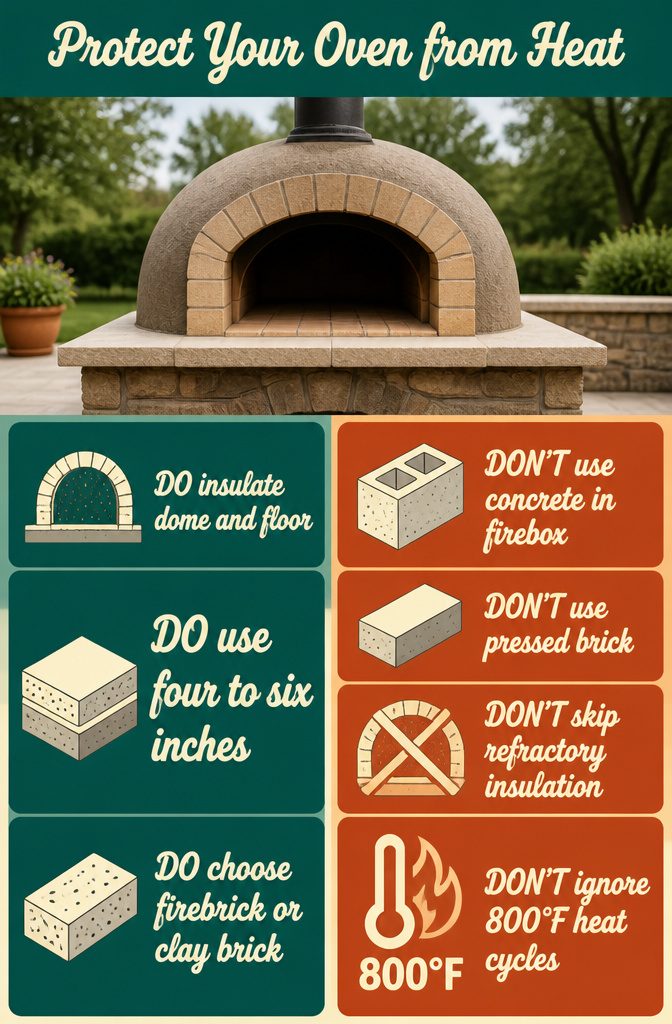
A pizza oven that survives more than a few fires depends on materials built to handle repeated heat cycles.
The most common mistake is skipping refractory insulation over the dome and underneath the floor. Plans that leave it out will give you an oven that loses heat fast or cracks after a season.
Concrete and pressed brick look tempting because they are cheap and easy to find, but both can spall from thermal shock when the oven cycles from cold to 800°F and back.
Fire brick and clay brick have low thermal conductivity, so they hold heat longer and resist cracking.
Between the firebrick floor and the base, you need at least four to six inches of insulation to prevent heat loss into the structure below.
That layer is not optional if you want the oven to reach pizza temperature and hold it.
What These Ovens Cook
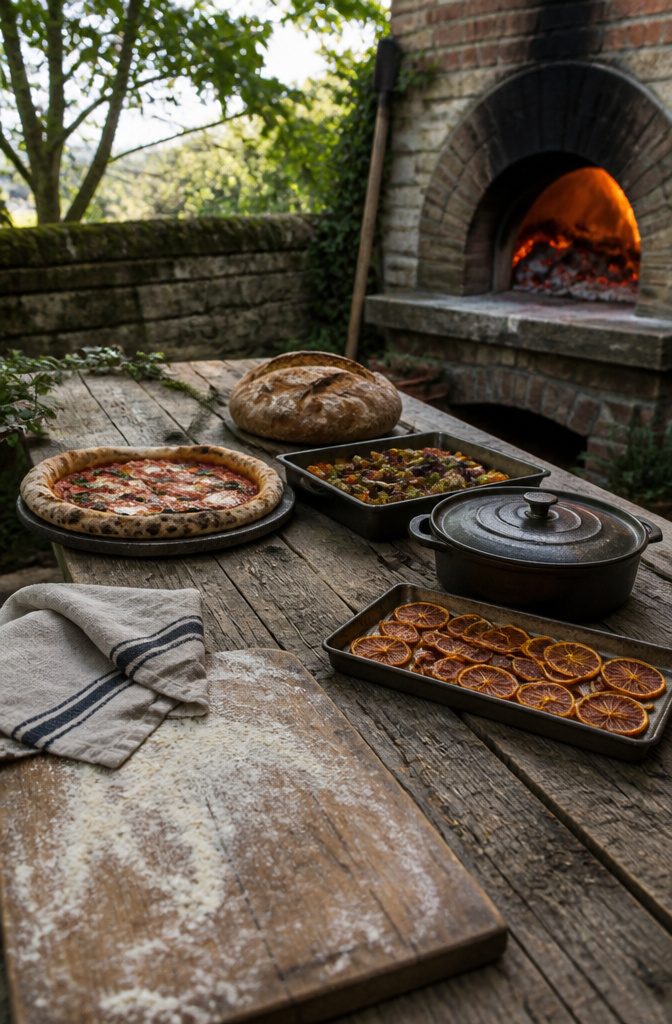
Pizza is where most builds start, but the oven handles far more once you know how to work with residual heat.
I’ve watched people pull focaccia and roasted vegetables from the same fire that cooked pizza an hour earlier, and the same oven that hits 900°F at full blaze will drop to bread range—around 450°F—once the coals are out.
The temperature curve matters more than the peak: a fire that burns for three and a half hours can deliver pizza at 700°F, crusty loaves at 500°F, slow braises as it cools past 400°F, and later fruit drying near the end.
You’re not locked into one dish per firing, and you’re not stuck with recipes written for wood ovens only.
A well-built brick oven holds heat long enough to cook anything a conventional oven would, as long as you time each dish to the falling temperature and don’t try to force everything into the first ten minutes.
Chimney Choice
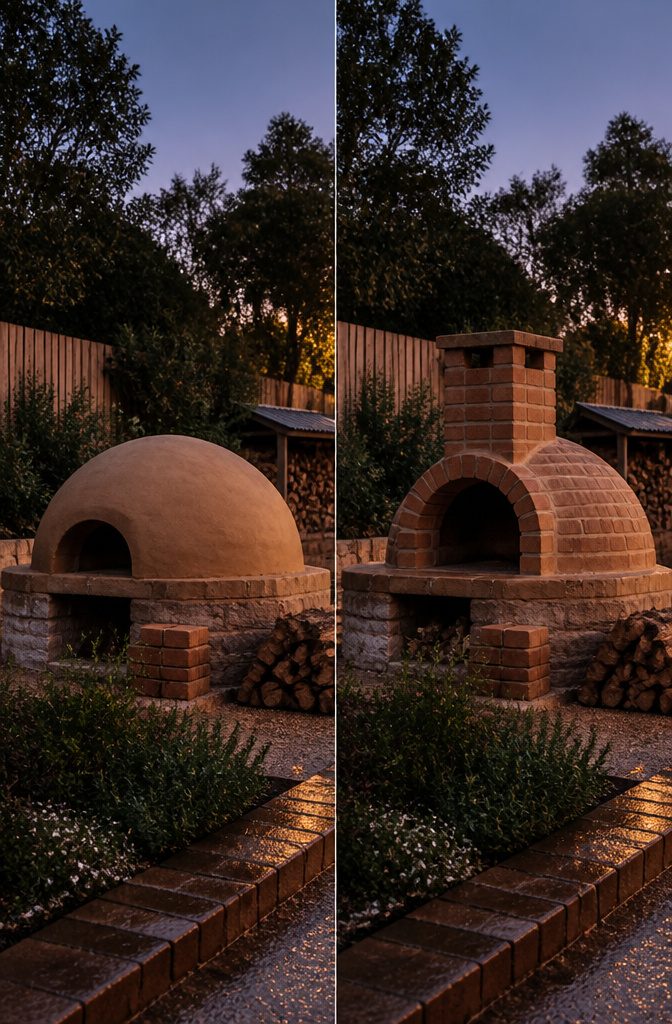
Traditional earth ovens can work without a chimney at all. They burn slowly, use less wood to heat the mass, and perform well if you’re willing to wait out the longer warmup.
A chimney changes that trade: the oven burns faster and pulls through more wood, which means you hit baking temperature sooner but go through fuel more quickly.
Some builders add one near the door opening anyway for better smoke control during the early stages of the fire.
The choice also depends on whether you want the oven to stay up year-round. A loose-brick pop-up design skips the chimney entirely and breaks down after each session, which keeps the project simple and the cost low.
A permanent dome with a chimney demands waterproofing, structural detailing, and ongoing upkeep, but it sits ready whenever you are. I’d start with the simpler build unless you know you’ll use it often enough to justify the maintenance.
Frequently Asked Questions
How can I build my own pizza oven?
Pour a reinforced concrete pad, cast a capstone with fiberglass rebar, build and fill a concrete block base, then set firebricks for the floor and arch using refractory mortar.
Install a flue at the front of the dome, veneer the exterior with brick or stone, and cure the mortar for at least a day before firing. The full build takes multiple days to allow proper curing between steps.
Is it hard to build your own pizza oven?
It requires moderate DIY skill, attention to detail, and at least one helper for lifting heavy pieces like the capstone.
If you can work with mortar, use a level, and follow a step sequence, the project is manageable. The hardest parts are getting the arch form right and moving the capstone into place.
How expensive is it to build your own pizza oven?
A loose-brick oven with steel bracing costs around $200 for materials. A permanent firebrick dome on a masonry base runs higher depending on veneer choice and whether you buy a kit or source bricks individually.
A cob oven built from clay and sand can cost under $50 if you mix your own materials.
Is it cheaper to build your own pizza oven?
Yes, building your own costs a fraction of hiring a professional or buying a finished outdoor oven.
A DIY firebrick build saves you labor costs, and a cob oven made from natural materials can run as low as 1% the price of a commercial pizza oven kit.