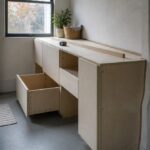
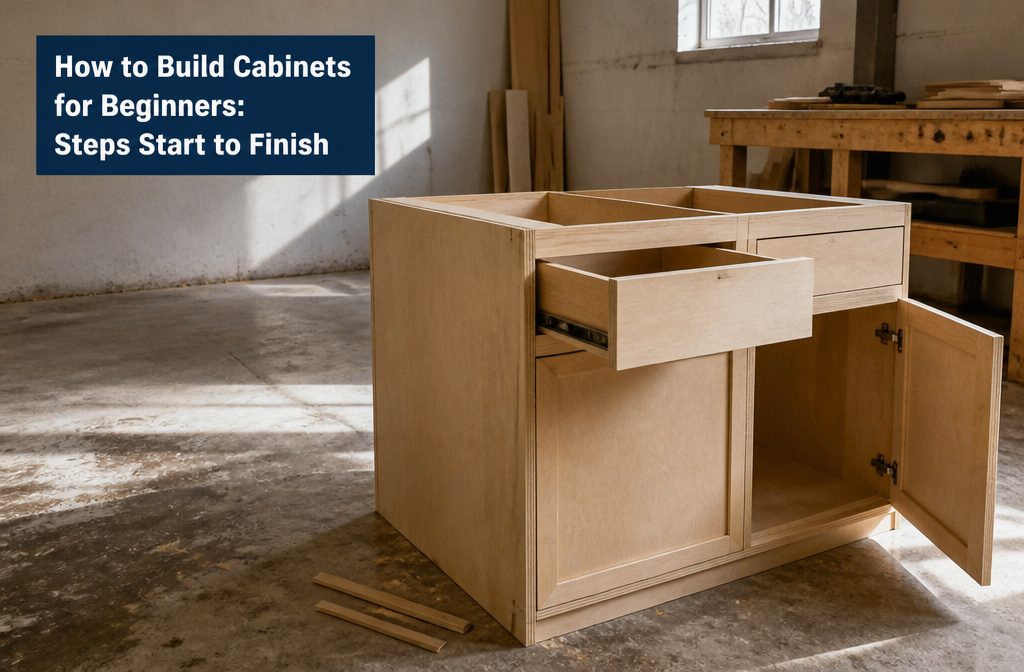
A base cabinet built from plywood costs $50 to $80 in materials and takes a weekend if you have a table saw and pocket-hole jig.
Most beginners stumble at the face frame, where uneven reveals between doors show up as crooked work no matter how square the box behind it was.
The fix is 1/8-inch spacers held against the frame while you mount each door, which keeps the gaps consistent without measuring every time.
1. Plan the Cabinet and Measure the Space
Measure the installation site before you cut anything. Wall-to-wall dimensions matter, but so do the irregularities: whether the walls bow, whether the floor sits level, whether the corner actually forms ninety degrees.
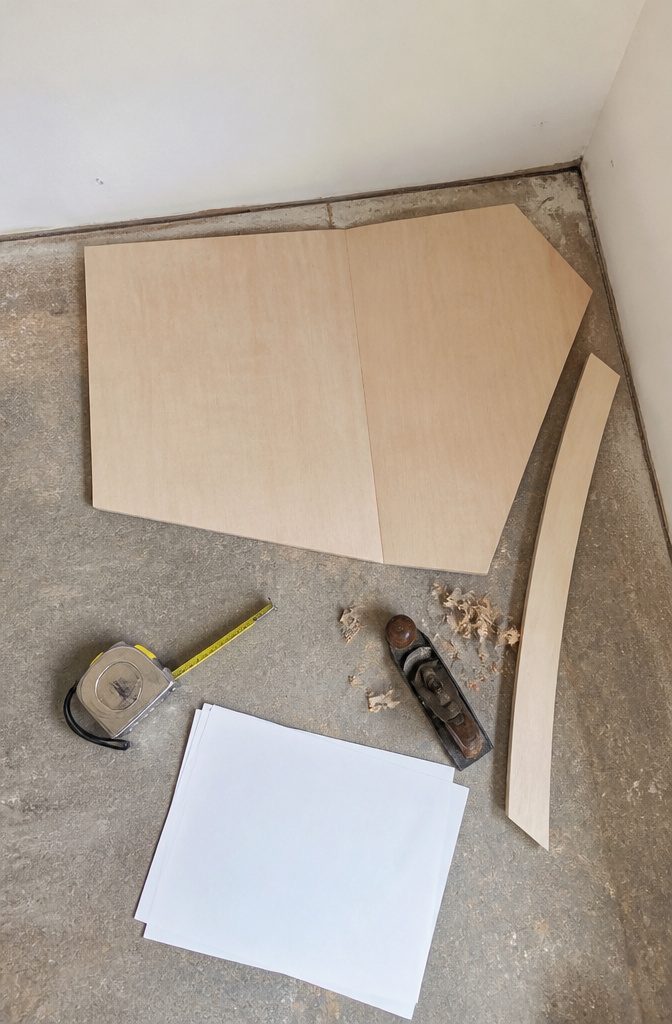
Minor irregularities—less than 1/4 inch over 4 feet—can be shimmed or scribed during installation, and I note those on my drawings along with stud locations marked with a finder. Larger variances need a template made from 1/4-inch plywood.
You mark a scribe line against the bowed wall, shape the strip with a block plane, and transfer that line back in the shop. Hot-melt adhesive holds strips together when a corner runs badly out of square.
Check for HVAC registers, outlets, switches, and thermostats in the cabinet footprint.
Some can be relocated; others require calling in a tech before you build. Measure doorways and hallways to confirm the finished cabinet will actually fit through.
When designing around existing walls, allow 1/8 to 3/16 inch clearance at the face frame for manageable caulk joints and easy installation. Upper cabinets gain 1 to 2 inches of clearance above them.
2. Pick Your Joinery Method
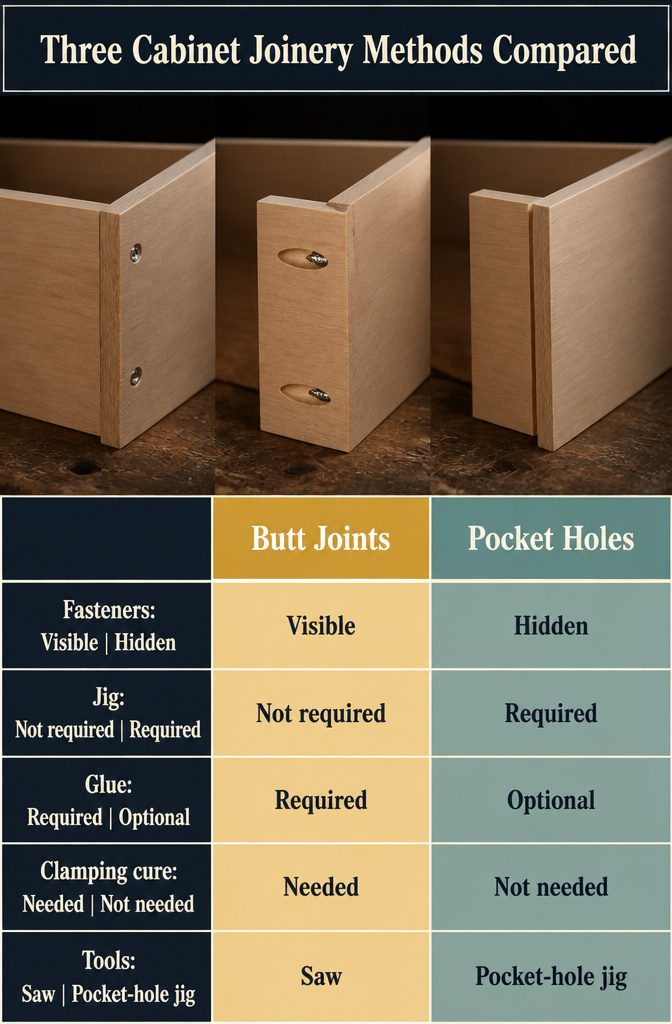
The simplest way to join your cabinet sides, top, and bottom is with butt joints and wood screws driven straight through.
You drill pilot holes, add glue, and drive the screws in from the outside. No jig required, and the box goes together fast.
The screws will show on the sides, but if you countersink them and fill the holes, they disappear under paint. If the cabinet sits between two others or gets covered with beadboard, the fasteners won’t be visible anyway.
Pocket-hole screws hide the fasteners and still give you a strong joint without much fuss. You drill angled holes on the inside edges with a pocket-hole jig, then drive self-tapping screws to pull the pieces together.
Glue is optional, and there is no curing time under clamps. I’d call this the best beginner method if you already own or plan to buy a jig, since you’ll use it again for face frames.
Dadoes give you a cleaner look: you rout a groove into the side panels, then slide the top, bottom, or back panel into place.
The joint is strong and nothing shows, but you need a router, the right bits, and enough confidence to set your fence distances without a gap. For a first cabinet, pocket holes are the easier win.
3. Cut Cabinet Parts to Size
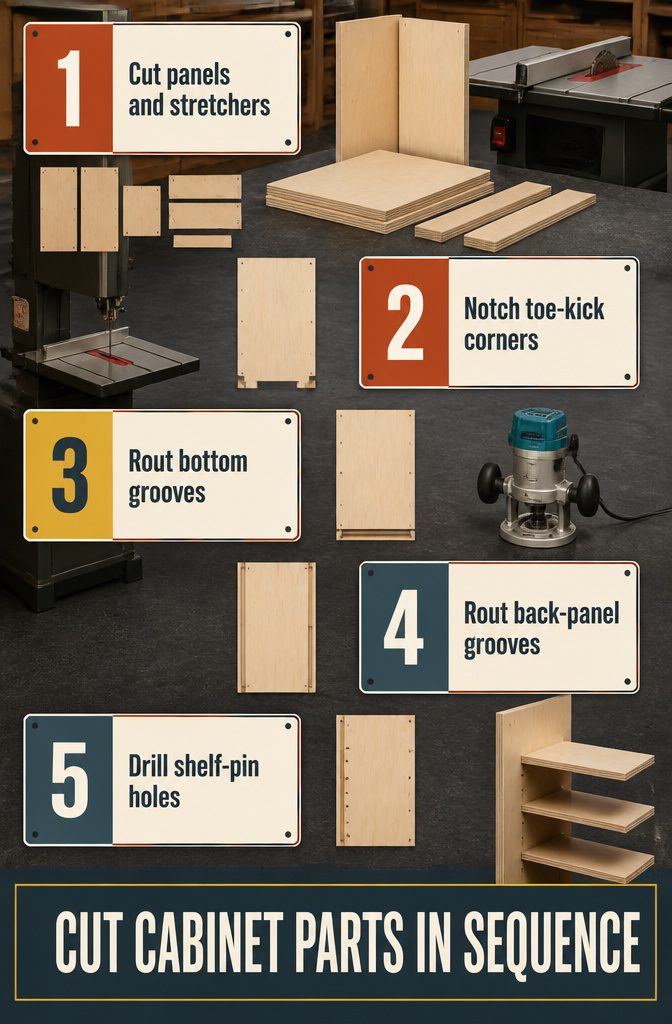
- Cut side panels, bottom, and top stretchers from 3/4-inch plywood using a table saw to remove factory edges and bring pieces to final dimensions. For base cabinets, stick with 3/4-inch thickness for strength; upper cabinets can use 1/2-inch plywood to keep weight down. Cut stretchers 4 inches wide and toe kicks 4 1/2 inches wide.
- Notch the bottom corners of each side panel where the toe kick will sit. A bandsaw with a fence and positive stop keeps cuts repeatable across all panels. No bandsaw? Clamp a square as a guide and run a fine-tooth jigsaw blade along it for a clean edge.
- Rout a 3/4-inch groove along each side panel to house the cabinet bottom, setting the router fence distance using the toe kick itself so the bottom sits flush with no gap showing.
- Rout a 1/4-inch groove along the back edge of each side for the plywood back panel, using a bit sized for 1/4-inch material.
- Drill shelf-pin holes before assembly, 6–8 per side, so adjustable shelves drop in later without fighting around assembled walls.
4. Assemble the Box
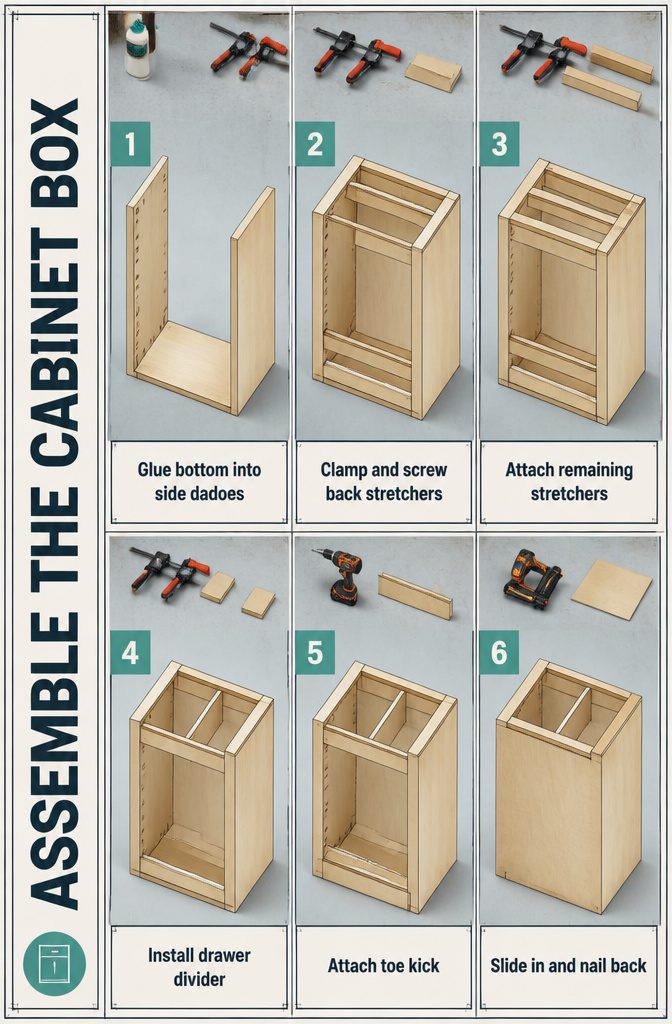
Assemble the Box
- Glue the bottom panel into its dado on both side panels, then clamp the assembly together. This is the only joint that needs glue, since pocket screws handle the rest of the structure.
- Spin the cabinet so the back faces up, then clamp and screw the back stretchers into place. Use a scrap of ¼-inch plywood as a spacer against the top stretcher to create a slot for the back panel.
- Flip the cabinet onto its top and attach two more stretchers. The spacer from step two leaves a pocket for the back to slide into later.
- Flip the cabinet again to install the drawer divider. Clamp it to the top stretcher using two scrap pieces as spacers, then screw it in place.
- Attach the toe kick with pocket screws.
- Cut a piece of ¼-inch plywood for the back, slide it into the pocket at the top, and nail it to the back stretcher with a brad nailer.
5. Add Face Frames and Join Cabinet Units
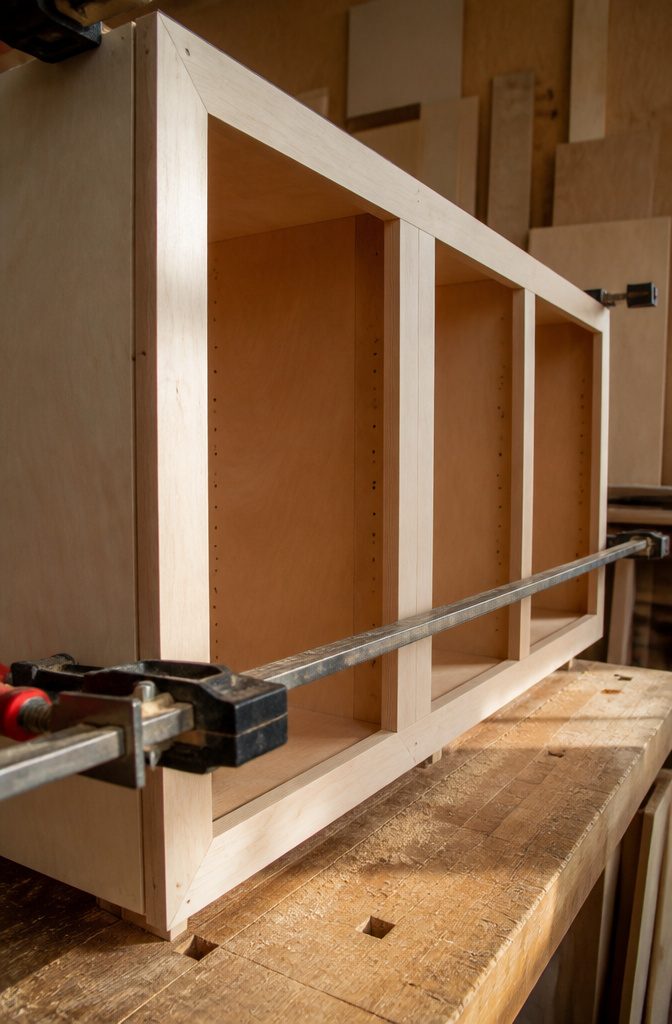
Face frames give the cabinet its finished front and let you join multiple boxes into one continuous run. I cut most of my frame pieces to 1 1/4 inches wide, which leaves a quarter-inch overhang on both sides of the cabinet box.
The center stile where two cabinets meet is cut to 2 inches. Hard maple matches plywood well if you’re staining, and poplar works if you’re painting.
Once the frame is assembled, I fasten it to the carcass with glue and clamps, using enough clamps that every rail and stile makes full contact. If you’re painting, brad nails work fine because the holes fill easily.
Standard practice in cabinet construction is to assemble the casework and then fabricate and attach the face frame. But for many built-in projects, I’ve found that it makes more sense to make the face frame in advance of the casework, especially if the case fits inside a three-sided space.
That approach means you can test-fit the frame before you build the boxes, which saves fixing problems later when everything is assembled.
Joining multiple cabinets is straightforward: clamp them flush from front to back, then drive screws through the inside walls where they meet. One combined face frame over both boxes hides the seam completely.
6. Build and Install Drawer Boxes
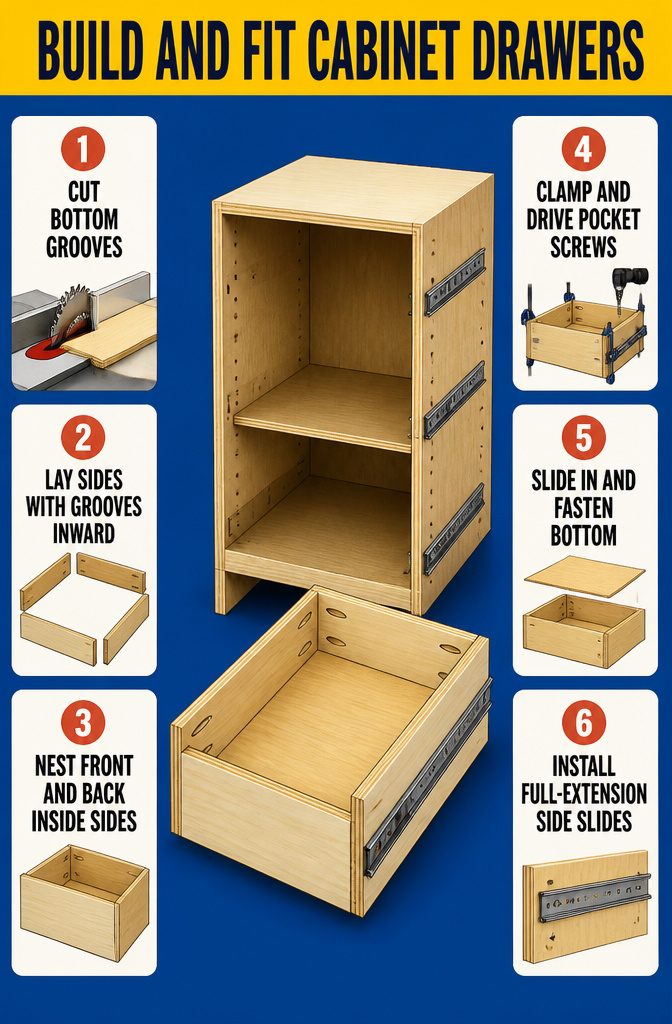
- Cut a ¼-inch groove along one edge of each drawer part using a table saw with the blade height set to ¼ inch and the fence positioned to leave a groove near the bottom edge.
- Lay out the four sides with grooves facing inward so they line up to form a continuous slot for the bottom panel.
- Arrange the parts so the front and back sit inside the side pieces, which creates a stronger box and hides the pocket holes drilled in the front and back.
- Clamp the corners together and drive pocket screws through the front and back into the sides, checking that the grooves still align all the way around before tightening.
- Slide the ¼-inch plywood bottom into the groove from the back opening and fasten it with brad nails or short screws.
- Install full-extension side-mount slides by screwing the cabinet member to the inside face of the cabinet at each drawer height, using plywood spacers to hold consistent vertical gaps between drawers.
- Attach the drawer member of each slide to the drawer box sides, following the centerline marked by the manufacturer.
- For a four-drawer cabinet, I space three drawers equally and make the bottom drawer taller to hold bulkier items without wasting the lower portion of the cabinet.
7. Make Shaker Doors
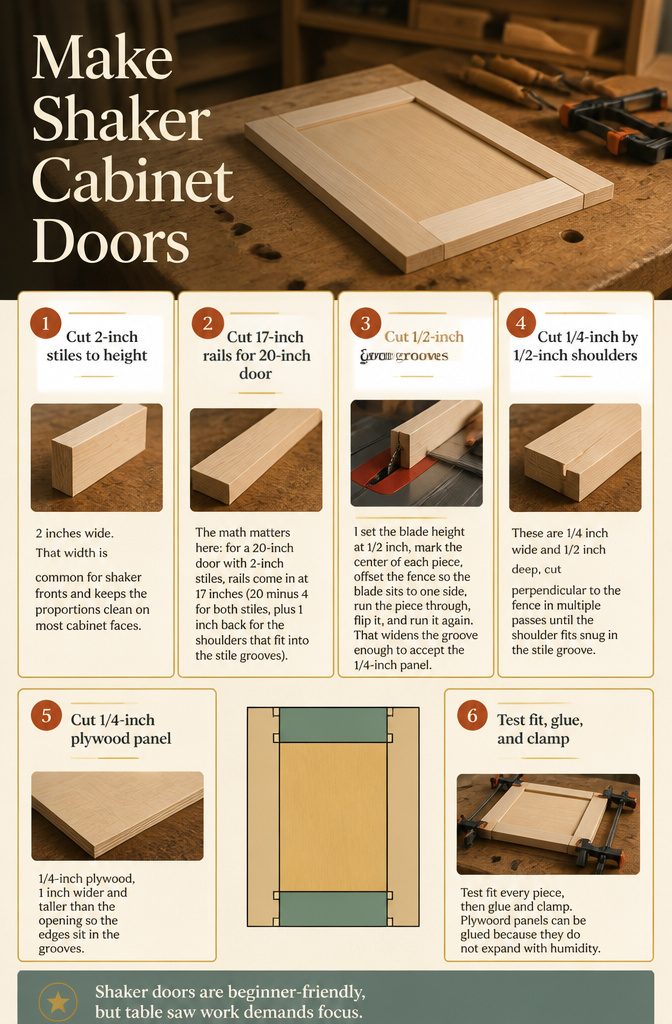
Make Shaker Doors
- Cut stiles to the height of the door, 2 inches wide. That width is common for shaker fronts and keeps the proportions clean on most cabinet faces.
- Cut rails to width. The math matters here: for a 20-inch door with 2-inch stiles, rails come in at 17 inches (20 minus 4 for both stiles, plus 1 inch back for the shoulders that fit into the stile grooves).
- Cut grooves in all stiles and rails. I set the blade height at 1/2 inch, mark the center of each piece, offset the fence so the blade sits to one side, run the piece through, flip it, and run it again. That widens the groove enough to accept the 1/4-inch panel.
- Cut shoulders into the rails only. These are 1/4 inch wide and 1/2 inch deep, cut perpendicular to the fence in multiple passes until the shoulder fits snug in the stile groove.
- Cut the center panel from 1/4-inch plywood, 1 inch wider and taller than the opening so the edges sit in the grooves.
- Test fit every piece, then glue and clamp. Plywood panels can be glued because they do not expand with humidity.
Shaker doors are beginner-friendly, but table saw work demands focus.
8. Fit Doors and Drawer Fronts
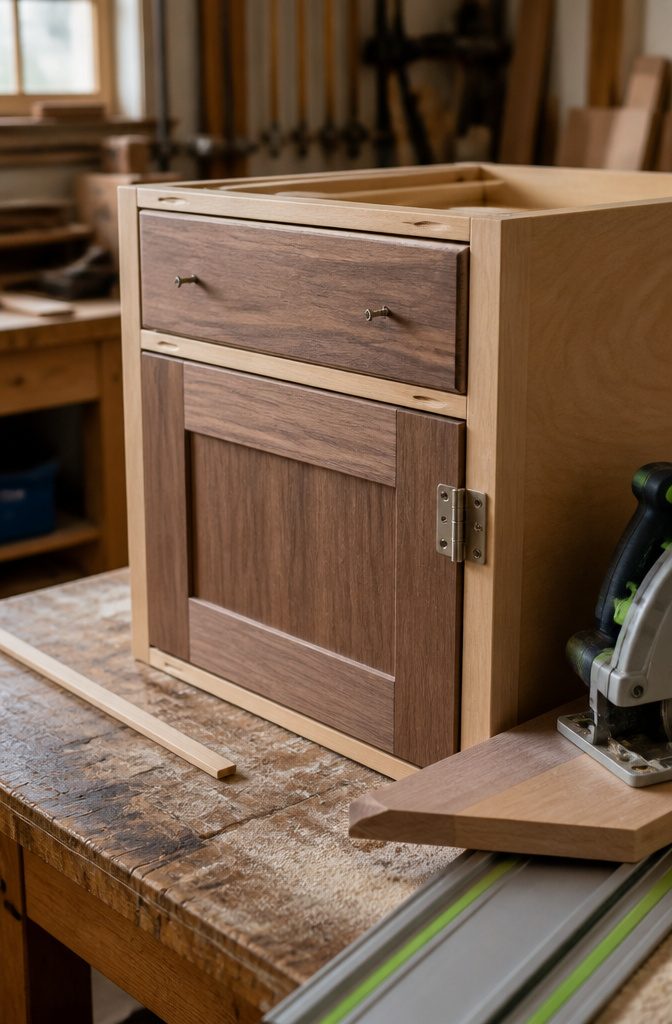
Doors and drawer fronts go on last, and getting them evenly spaced is where 1/8-inch spacers make the difference.
I set the first door on a temporary spacer strip stuck to the face frame with double-sided tape, drill pilot holes, and screw it in place.
For drawer fronts, I lay a 1/8-inch spacer strip on top of the door to hold the reveal, line up the drawer front, then run screws through the holes I drilled for the pulls.
That holds it steady while I add permanent screws from the back. Once those are in, I remove the front screws, drill through for the hardware, and mount the pulls.
The hinge choice matters.
Non-mortise hinges save time and work fine for built-ins. If you order doors to the exact opening size, trim 1/16 inch off each edge for the margin.
A track saw handles those cuts quickly, and a 3° bevel on the closing edge lets the door swing shut without binding. Ordering doors pre-made is faster and often cheaper than building them yourself.
9. Level, Secure, and Finish
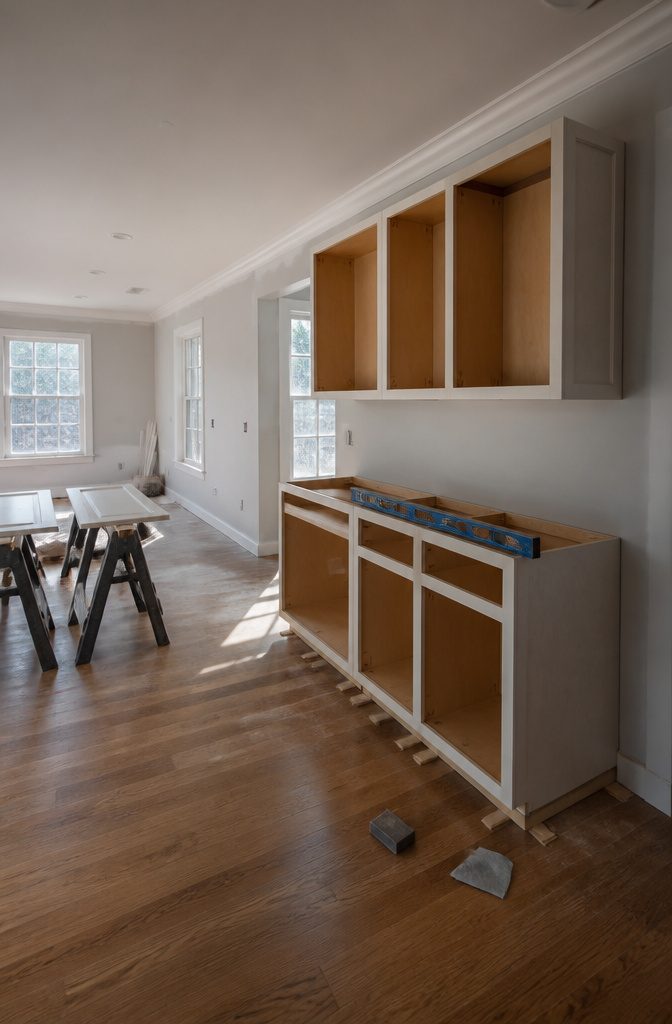
- Shim the base cabinets level and plumb before you fasten anything. Use a level on both front-to-back and side-to-side planes, and slip shims under the boxes where the floor drops. A cabinet that sits crooked telegraphs through every door and drawer you hang later.
- Fasten base units to wall studs with cabinet screws, not drywall anchors. A stud finder marks where framing sits behind the drywall. Built-ins hold hundreds of pounds of books and sometimes climbing kids, so the connection has to hit solid wood.
- Stack upper cabinets or shelf units on top of the base, leaving 1 inch to 2 inches of clearance below the ceiling. Ceilings run out of flat more often than floors do, and crown molding hides the gap without fighting the taper.
- Join stacked units with pocket-hole screws driven from behind the face frame. The fasteners stay hidden and the joint stays tight without filler that shows through paint later.
- Sand all surfaces with 120-grit paper, then 180-grit. Sharp corners get a couple of strokes with a block plane first. A random-orbit sander handles flat panels; everything else I work by hand or with a sanding block.
- Prime with water-based primer like Kilz 2 before final assembly. Painting cabinets after they are hung and fastened to the wall is harder than it needs to be, and the finish never looks as clean. I prime sections flat on sawhorses, then assemble and install.
Materials That Work for Beginners
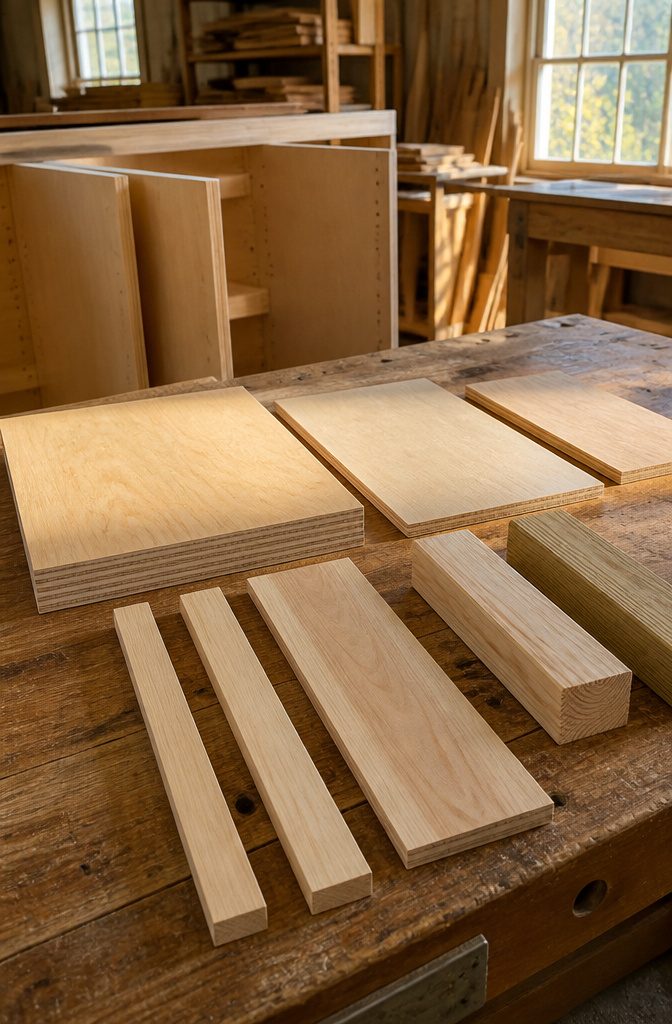
Three-quarter-inch plywood is what you want for base cabinet carcasses, and half-inch plywood for uppers. The thickness difference comes down to weight.
Upper cabinets sit on the wall and carry plates or glassware, so half-inch material keeps the load manageable. Base cabinets carry pots, appliances, and countertops, so three-quarter-inch plywood holds the structure steady under more stress.
For face frames, poplar is the standard choice if you plan to paint. It takes primer evenly and costs less than hardwood.
Hard maple works when the cabinets stay natural or stained, though the expense climbs quickly. Most face frames run one and a quarter inches wide with two-inch center stiles where cabinets meet, cut from nominal 1×2 or 1×3 stock.
Cabinet backs take quarter-inch or half-inch plywood. Quarter-inch is lighter and easier to handle, but half-inch adds rigidity if the cabinet spans more than four feet.
If you frame base cabinets with dimension lumber instead of all plywood, 2×4s or 2×3s build a sturdy box, though you give up some interior depth compared to sheet goods alone.
Tools You Need to Start
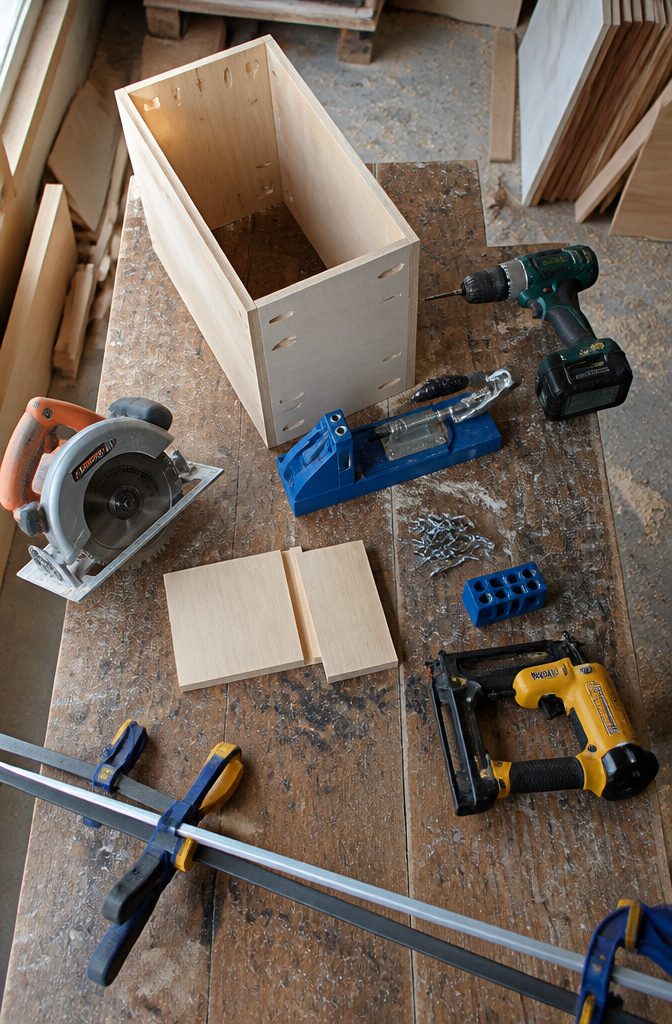
You need a pocket-hole jig — the Kreg Jig K4 is the one builders reach for — along with a drill, clamps, and a saw (table saw or circular saw, depending what you have room for).
A 16-gauge finish nailer makes installation faster and cleaner, since you can attach units without filling screw holes. If you want adjustable shelves, add a shelf-pin jig; drilling those holes after assembly is awkward.
The jig determines which joinery you can use:
- Pocket-hole screws need the jig but hide fasteners from view and make strong joints without long clamp time. You’ll drill a lot of holes.
- Butt joints work without a jig but leave exposed fasteners or require more finish work.
- Dados need a table saw or router table and take more precision, so I’d skip them on a first build.
Most beginner-friendly plans assume pocket holes for the face frame and box joinery, so budget for the jig if you’re following those.
Wall and Site Problems to Watch For
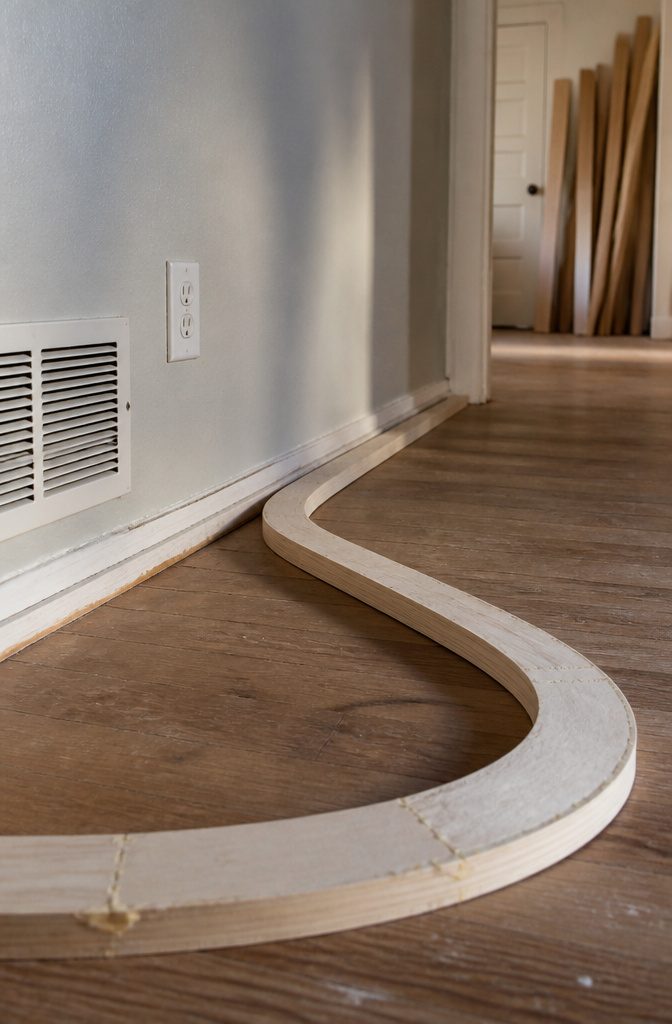
Before you frame one board, record what the walls and floor actually do. I measure high, middle, and low on every wall that will meet a cabinet, then check if corners hold ninety degrees.
If anything is off by less than ¼ inch over four feet, note it on your drawing and plan to shim or scribe-fit during install. That much variance is normal and easy to hide.
Bigger problems need templates.
I cut strips of ¼-inch plywood, hold them against a bowed wall, and mark the actual contour. A block plane shapes the strip to fit, then I trace that line onto the cabinet back in the shop.
For a corner that is badly out of square, hot-melt adhesive holds plywood strips together into one rigid template you can measure from.
Walk the space with a stud finder and mark framing for fasteners.
Check every spot a cabinet will cover for HVAC registers, outlets, switches, and thermostats. Some you can relocate yourself if the run is short.
Others need an electrician or HVAC tech before you start building. Measure doorways and hallways on the way out, because a cabinet that does not fit through the door is a cabinet you rebuild in pieces.
Frequently Asked Questions
Is it cheaper to build your own cabinets or buy them?
Building your own cabinets costs less than buying pre-made ones, especially for base cabinets made from 3/4-inch plywood and poplar face frames.
The savings come from labor, since you’re doing the work yourself, but you need to own or buy a pocket-hole jig, clamps, and a saw.
Ordering pre-made doors often costs less than building them yourself, so most builders mix shop-built boxes with purchased doors.
How difficult is it to build your own cabinets?
Building cabinets is manageable for beginners if you start with pocket-hole joinery and avoid complex features like inset doors or mortised hinges.
The hardest parts are measuring irregular walls accurately and keeping everything square during assembly. Most first-time builders can complete a simple base cabinet in a weekend once they have the materials cut and a pocket-hole jig set up.
What kind of wood do you use to build cabinets?
Use 3/4-inch plywood for base cabinet boxes and 1/2-inch plywood for upper cabinets to keep wall-mounted units lighter.
Poplar works best for painted face frames because it takes primer evenly and costs less than hardwood, while hard maple is the choice for stained or natural finishes.
Cabinet backs need 1/4-inch plywood for most builds, or 1/2-inch if the span exceeds 4 feet.
What is the cheapest way to build kitchen cabinets?
The cheapest method uses butt joints with wood screws driven straight through the plywood box, then countersunk and filled before painting.
No jig is required and assembly goes fast, though the fasteners show on the sides unless the cabinet sits between others or gets covered.
Framing base cabinets with 2x4s or 2x3s instead of all plywood also cuts material costs, but you lose some interior depth.