A hutch display that looks collected instead of staged costs you an afternoon and nothing if you use what you already own, but most people skip the one step that makes the difference: pulling everything off the shelves before deciding what goes back.
The mistake is styling around what’s already there instead of seeing what the empty frame can actually do.
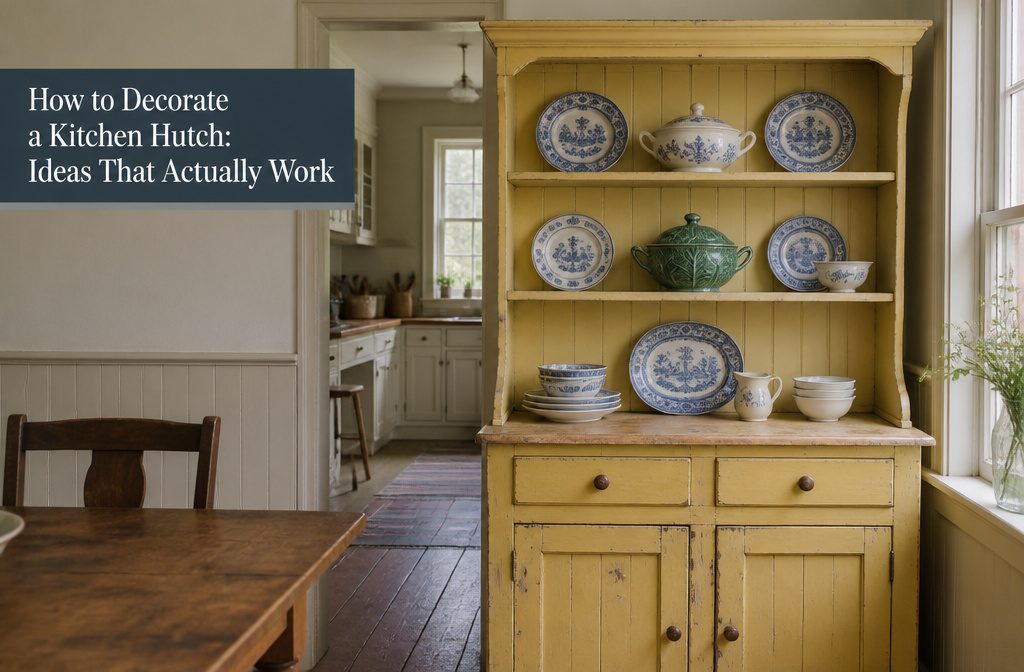
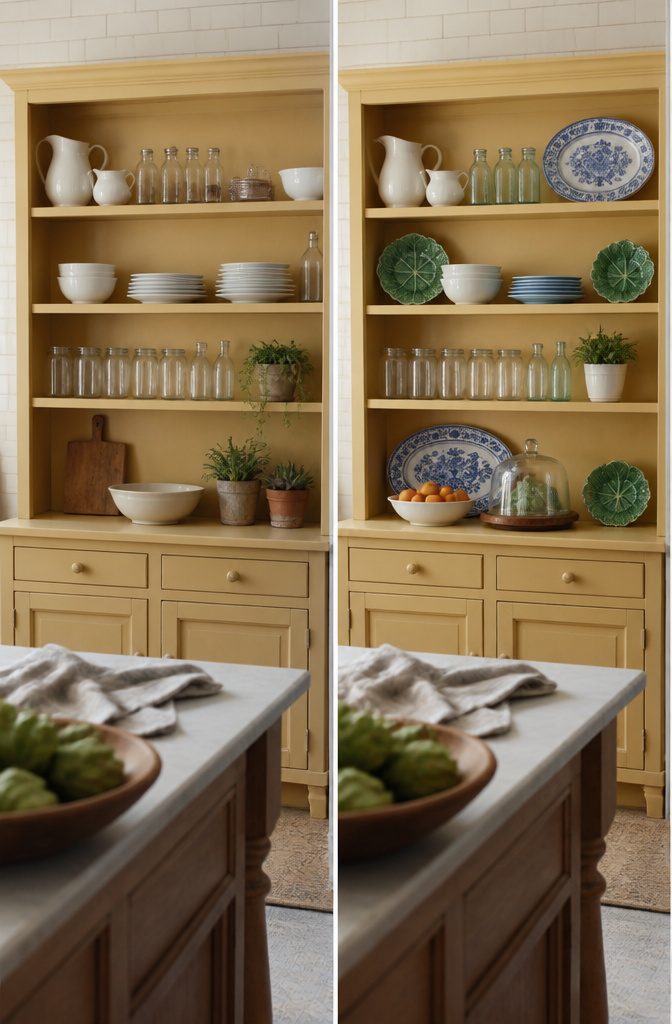
A yellow-painted hutch filled with blue-ware plates and cabbage-ware servers holds together because the same three colors repeat on every shelf, not because every piece matches.
1. Start With a Blank Slate
Start With a Blank Slate
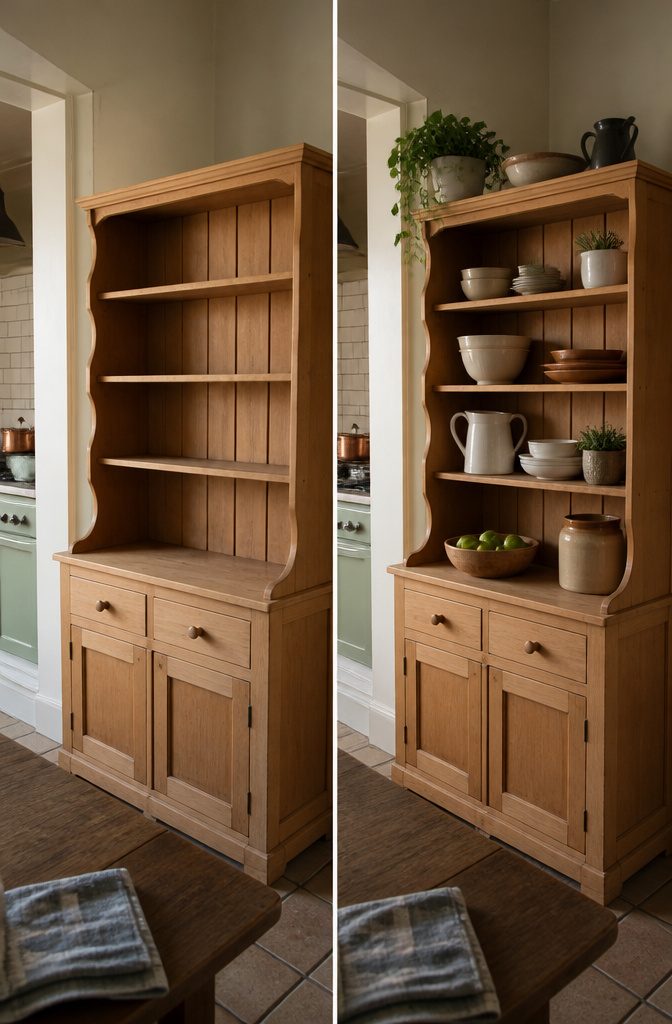
Pull everything off the shelves before you decide what goes back. It sounds backward when the hutch is already full, but starting fresh lets you see the piece itself instead of working around what’s already there.
I find it much easier to build a display with intention when I’m not trying to edit something that evolved over months.
Stand back once the shelves are bare. The structure becomes obvious: how much depth you actually have, where the sight lines fall, whether the shelves feel balanced or lopsided.
A blank hutch shows you what the piece can do instead of what it’s been doing, and that makes the next decisions clearer. You’ll bring some things back, but now you’re choosing them, not inheriting them.
2. Decide What the Hutch Needs to Do
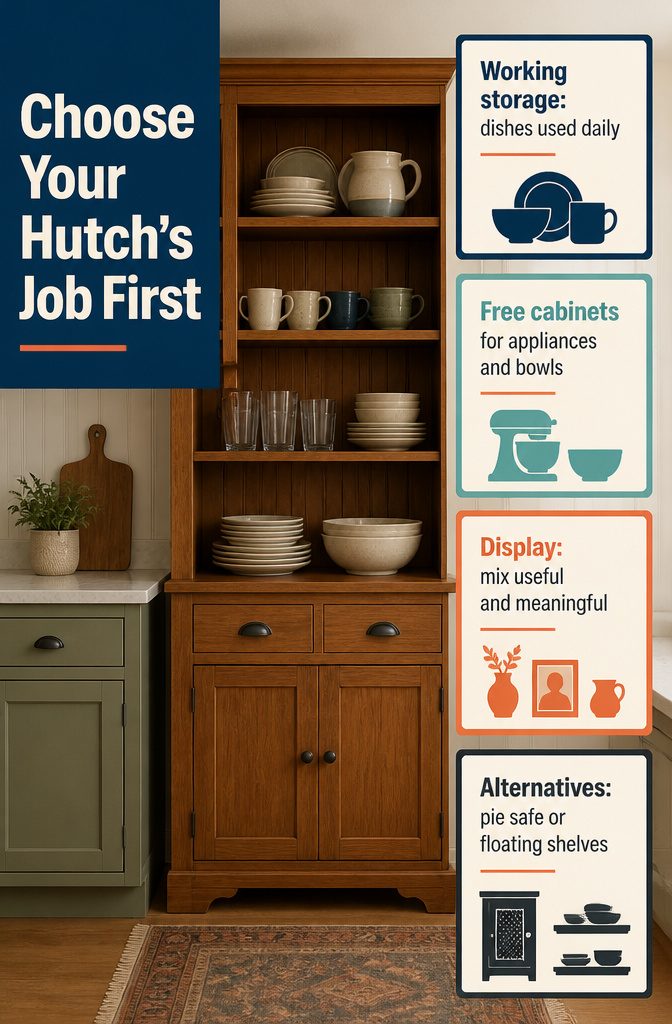
Before you fill the hutch, figure out whether it’s working storage or a display piece. If cabinet space is tight, the hutch can hold everyday dishes, mugs, glasses, and serving pieces you actually reach for.
That frees up closed cabinets for small appliances and mixing bowls. I’d rather see a carefully chosen collection of stoneware out where it earns its keep than fine china gathering dust on open shelves.
If storage isn’t the driver, the hutch becomes a place to mix functional items with things that matter to you. Either way, the decision shapes what belongs there.
A pie safe, an apothecary with drawers, or even floating shelves can all serve the same role, but the function comes first. Once you know what the piece needs to do, the styling choices get simpler.
3. Use Dishes and Kitchenware as Decor
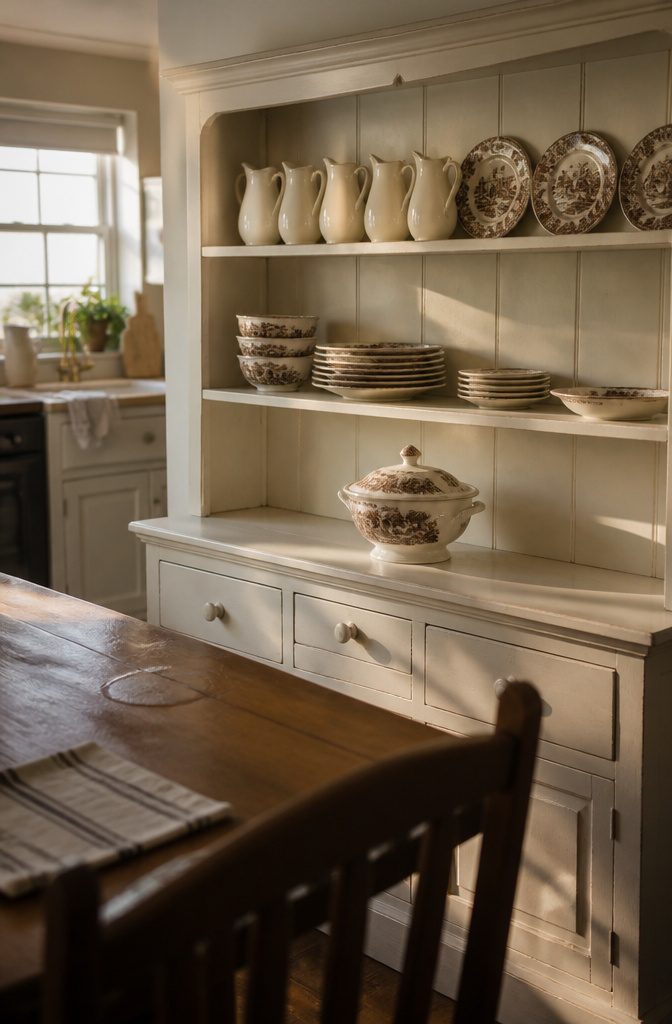
The dishes you already own are enough to fill most of a hutch, and using functional pieces instead of purely decorative objects keeps the look honest.
A set of five creamware pitchers lined up across one shelf alongside three transferware dinner plates gives the impression of a real collection without needing anything new.
If you have a brown transferware set with four bowls, four plates, and four salad plates, you can stack the salad plates on one side with a small oval bowl behind them, then stack the bowls on the other side with another serving piece behind them.
A rectangle tray or a soup tureen takes center stage on the bottom shelf. The advantage here is simple: everything on display is something you actually use, so the hutch doesn’t feel staged.
4. Mix Functional Items With Personal Pieces
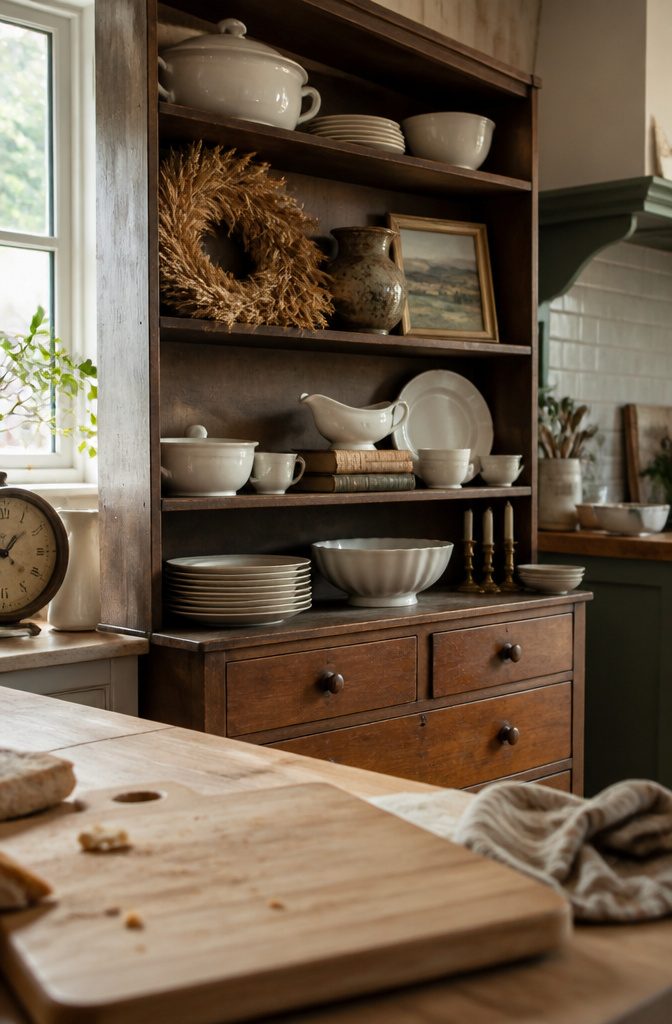
The hutch stops feeling like a catalog display when you mix serving bowls and teacups with things that mean something to you.
Stack a few vintage books as a platform for a gravy boat. Tuck a wheat wreath or bleached pinecone next to the dishes.
Add a small framed landscape, a pottery piece from a trip, or candlesticks from a wedding. A shelf should look like it came together over time, not all in one styling session.
I gather items from around the house rather than buying new decor.
A ceramic vase, an old clock, a jar that belonged to someone in the family—those sit well next to white ironstone or everyday plates without fighting for attention.
If the hutch holds what you actually use for entertaining, the functional pieces become part of the display instead of competing with it. The combination reads as collected over time, which is what makes it feel personal.
5. Build Height and Layers
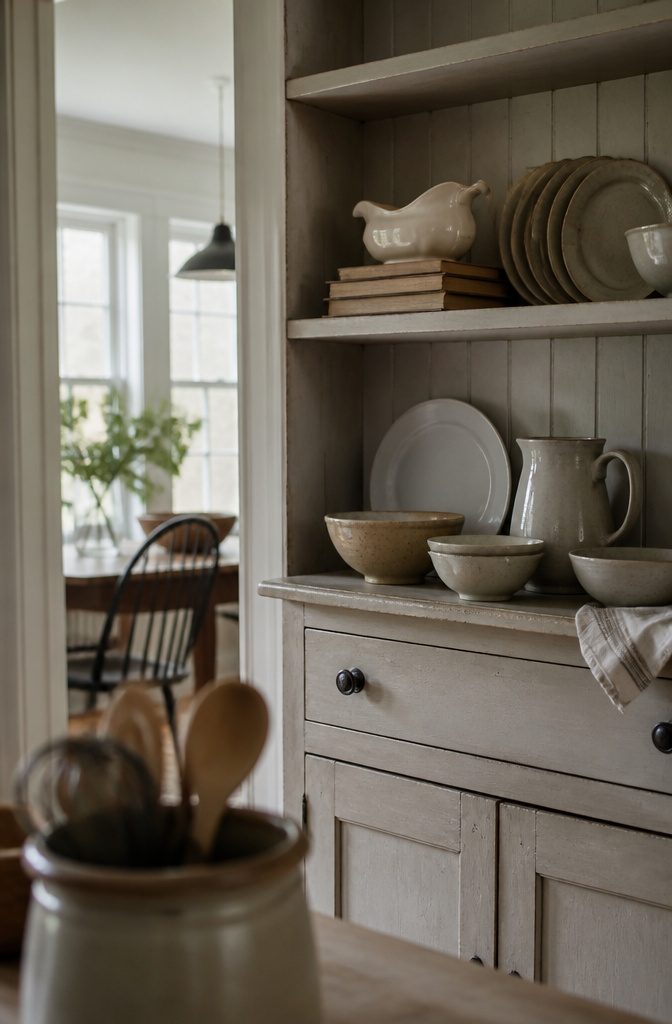
The quickest way to make a hutch display look intentional rather than just stocked is to work in different heights.
I stack a few bowls, lean a plate behind them, and set something taller at the back. The eye moves through the layers instead of hitting a flat row of things at the same height.
Odd-number groupings work better than even ones. Three bowls on one side, five plates on the other, or a set of pitchers staggered by size all read as arranged rather than lined up.
When I add something low in front and something tall behind, the depth shows up immediately.
A gravy boat on top of a couple of stacked books lifts it just enough to break the line, and the books themselves add texture.
Stands and plate holders give you another way to add height without bringing in more objects.
A row of leaning plates behind shorter pieces creates a backdrop that fills the vertical space, especially on tall shelves where leaving the back empty makes the whole thing feel underfilled.
6. Repeat Colors and Textures for Cohesion
Repeat Colors and Textures for Cohesion
A limited palette holds a hutch display together when you might otherwise be working with items from different decades and price points.
Picking two or three colors and repeating them across every shelf gives the arrangement structure without making it look staged.
A yellow-painted hutch paired with blue-ware plates and servers, with a few cabbage-ware pieces mixed in, feels bold but still grounded. The repetition is doing the work.
The same principle applies to texture and finish. Glass shows up in vintage bottles, apothecary jars, and cloches; white appears in stacked bowls, plates, and architectural salvage pieces; coral adds a seasonal layer.
Each material recurs on multiple shelves, which ties the display together even when the individual objects vary in size or style.
Wood, ironstone, and natural elements can all coexist if they follow that rule of recurrence rather than appearing once and disappearing.
7. Balance the Display Across Shelves
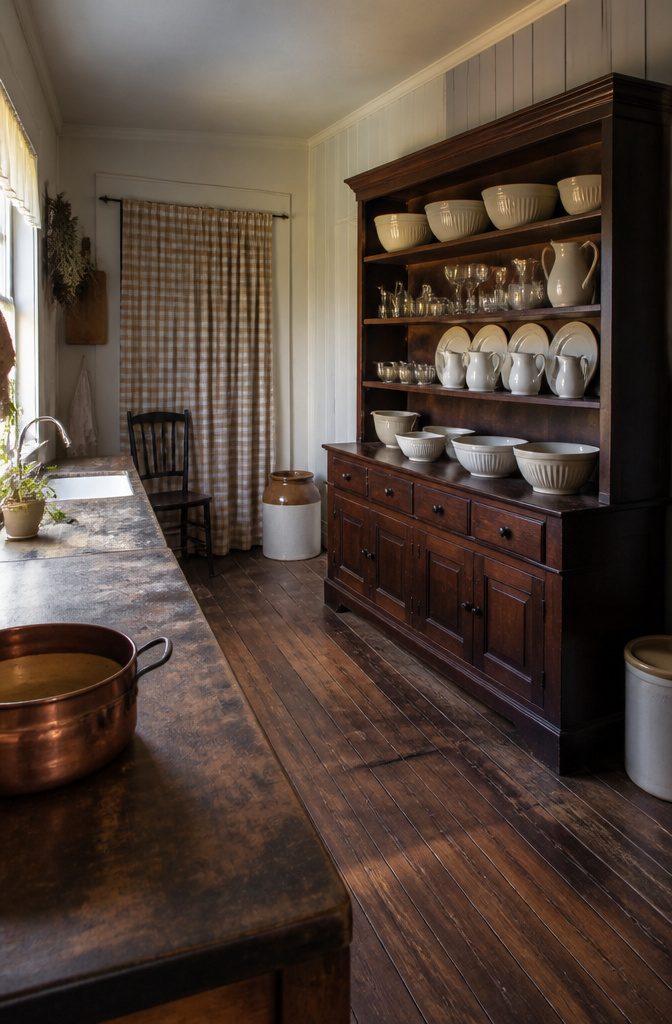
Step back and look at the whole hutch after you’ve styled each shelf. Distribute your larger pieces and your smaller pieces across different levels instead of clustering all the big items on top or all the glass on one side.
If the right half ends up heavy with white ironstone and the left is mostly glass, move a few pieces until the eye travels evenly across the frame.
I style one shelf at a time, but once they’re all done, I adjust. A row of five pitchers might look plain until you slide a few dinner plates standing upright behind them, breaking up the repetition.
Sometimes I move an item from one shelf to another when two shelves start to look too similar. Balance without rigid symmetry works best: enough variation that the display feels collected rather than formulaic.
8. Add Greenery or Natural Elements
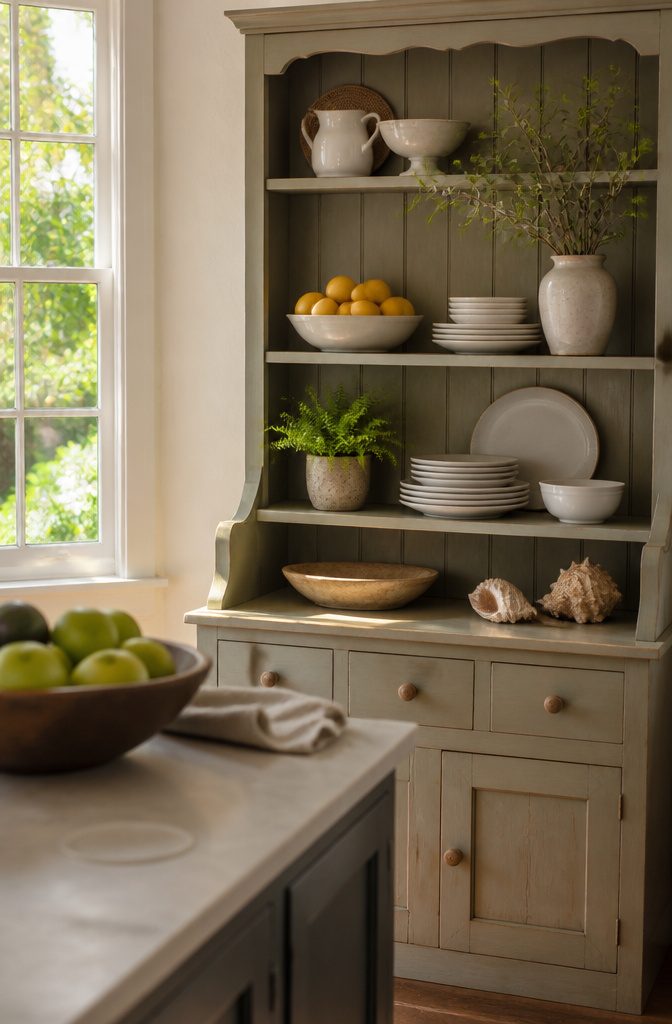
Greenery changes a hutch immediately. A bowl of apples or lemons on one shelf, a vase of branches with green leaves on another, and suddenly the display reads less staged.
I’ve found potted succulents or ferns work particularly well beside stacks of white dishes, because the texture contrast is strong and the care is low. Dried flowers are another route if watering isn’t realistic in that spot.
The seasonal approach gives you permission to refresh without rethinking the whole arrangement. Pine branches and a dish of ornaments sit naturally on a hutch through December.
Spring calls for eggs and fresh flowers. Summer leans coastal: shells, coral, a few old bottles.
Fall pulls in mini pumpkins or dried stems. Each rotation keeps the display feeling current without requiring you to pull everything off the shelves and start over.
9. Add Lighting or Reflective Elements
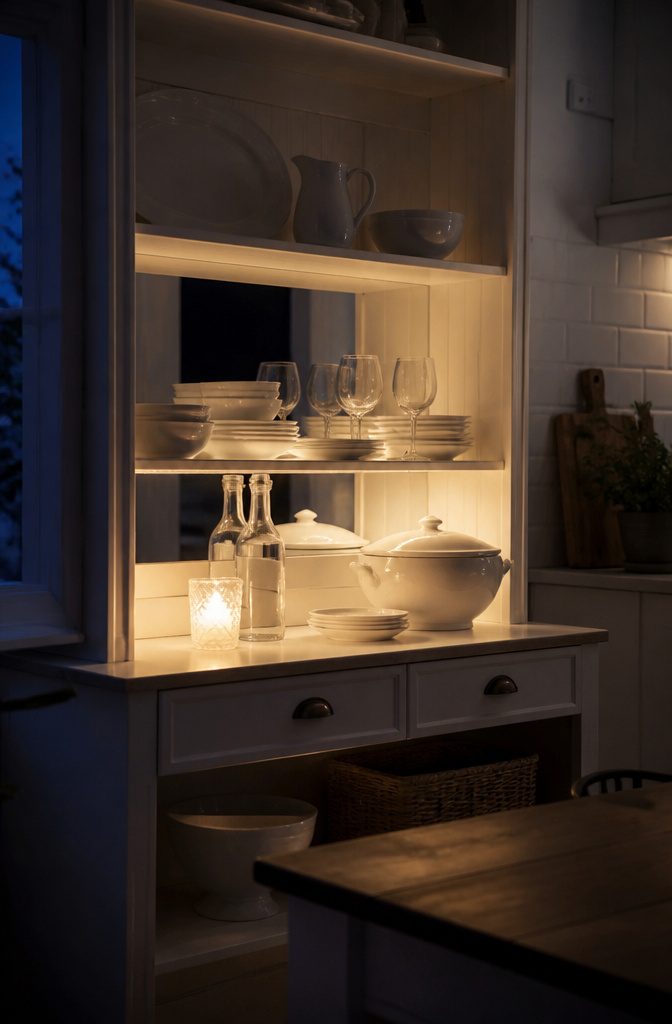
A mirror tucked into the back of a shelf reflects light forward and doubles whatever is in front of it, which makes a display look fuller without adding more objects.
I’ve seen this work particularly well on a second shelf, where the reflected light helps balance the weight of dishes or glassware on either side. The mirror itself becomes part of the composition rather than just a trick.
If the hutch has deep shelves or sits in a corner that doesn’t catch much window light, candles bring warmth and movement to the arrangement. Choose different heights and shapes so the group reads as intentional rather than leftover.
Scent matters if the hutch is near where people gather, but unscented pillars work just as well when you want the look without competing with cooking smells.
LED strips hidden behind a ledge or mounted beneath a shelf add drama without taking up surface space.
White light gives the display a gallery feel; colored LEDs can pick up tones already present in your dishes or décor. The under-lit effect works best when the light source itself stays invisible.
10. Edit and Adjust After Arranging
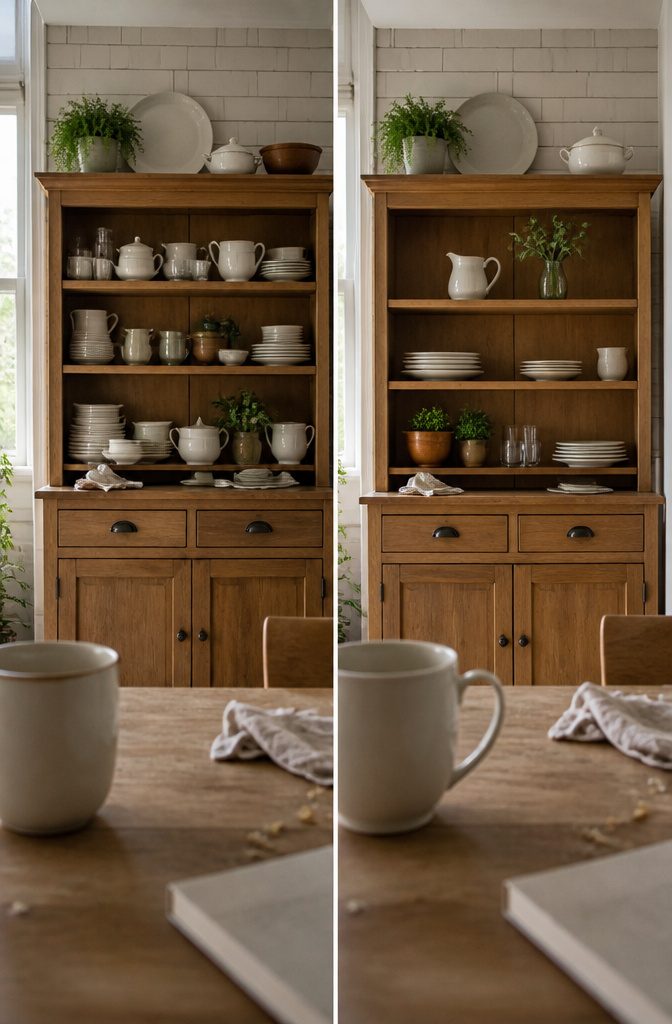
Once you’ve arranged everything, step away for at least fifteen minutes. When you come back, you’ll notice stacks that looked balanced five minutes ago now feel crowded, or a shelf that seemed full enough suddenly has an obvious gap.
I walk away from every hutch I style, come back later, and move at least three things before I call it done.
The adjustment phase is where you shift a plate stack two inches left, swap one plant for another, or pull out the piece that felt clever but now just feels like clutter.
Small moves matter more than you expect. A cream pitcher that looked fine on the right side of the top shelf might need to land on the left to balance the weight of a tall vase below it.
Edit until the whole hutch reads as one cohesive display, not a collection of individual shelves that happen to share the same frame.
11. Refresh the Display Seasonally
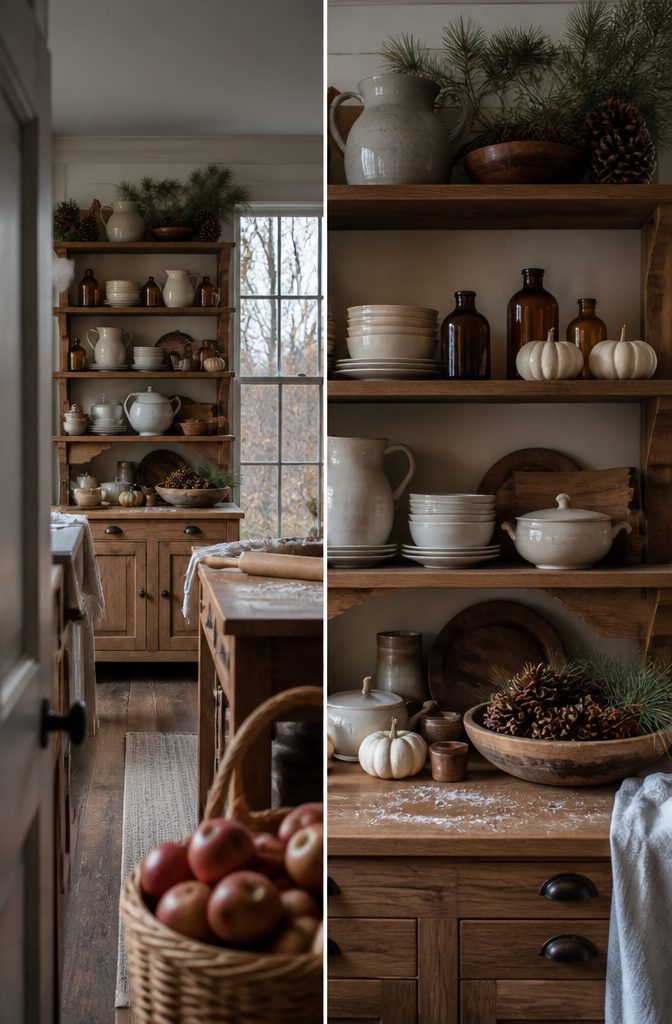
Switching a few objects out every season or holiday keeps the hutch from looking static without forcing you to clear the whole thing and start over.
When fall arrives, replace summer coral or blue glass with baby white pumpkins and warm amber bottles.
For Christmas, swap the pumpkins for small bottle-brush trees and vintage silver ornaments. The pinecones that worked in fall can give way to realistic pine branches and a dish of ornaments in December.
You can go further and change the full display if you enjoy the process, but most of the visual refresh comes from rotating a handful of pieces that signal the season.
In fall, mini pumpkins and dried gourds do the work. Spring calls for decorative eggs or realistic flowers.
Summer leans on shells, coral, or old bottles. The rest of the hutch stays put, which means you get a new look without the effort of restyling every shelf.
Hardware and Repainting
Hardware and Repainting
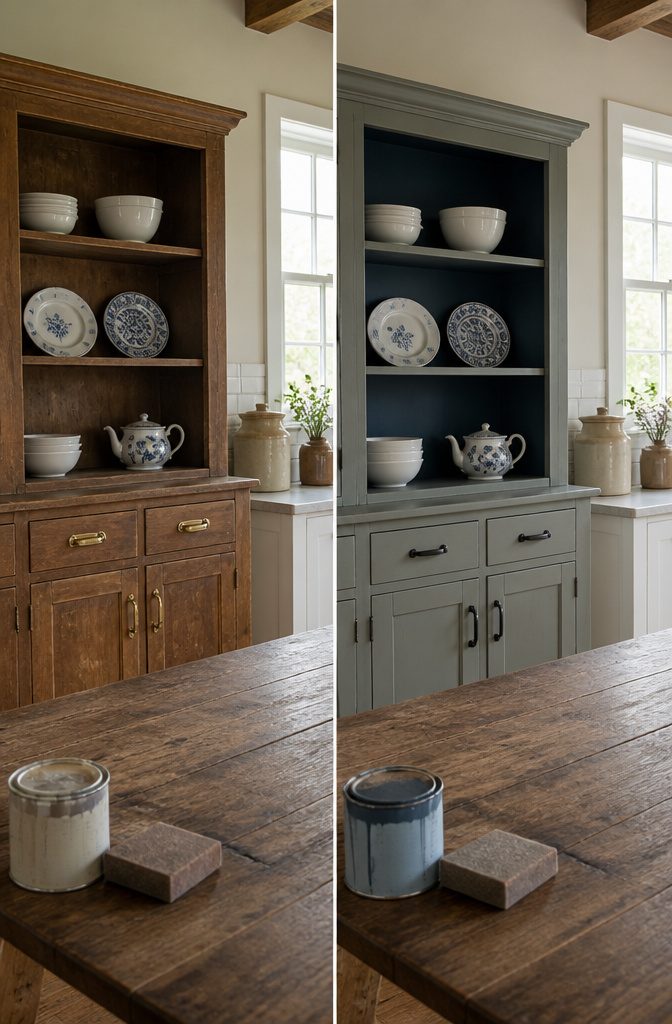
Changing the hardware on an older hutch can shift how the whole piece reads in the room.
Swapping out dated brass or plastic pulls for simple matte black or brushed nickel hardware takes about fifteen minutes and costs less than thirty dollars if the new pulls match the existing hole spacing.
If they don’t, you’ll need to fill the old holes with wood filler, sand smooth, and touch up the finish before drilling new ones.
Repainting works the same way. A hutch that feels out of place often just needs to match the palette you’re already using.
Sand lightly to rough up any gloss, prime if you’re going from dark to light, then apply two coats of a color that ties into your backsplash, walls, or the dishes you plan to display.
I’d keep the interior a contrasting tone if the hutch has open shelving, since that backdrop makes whatever you arrange pop more than matching paint would.
Hanging Items With Hooks and Plate Holders
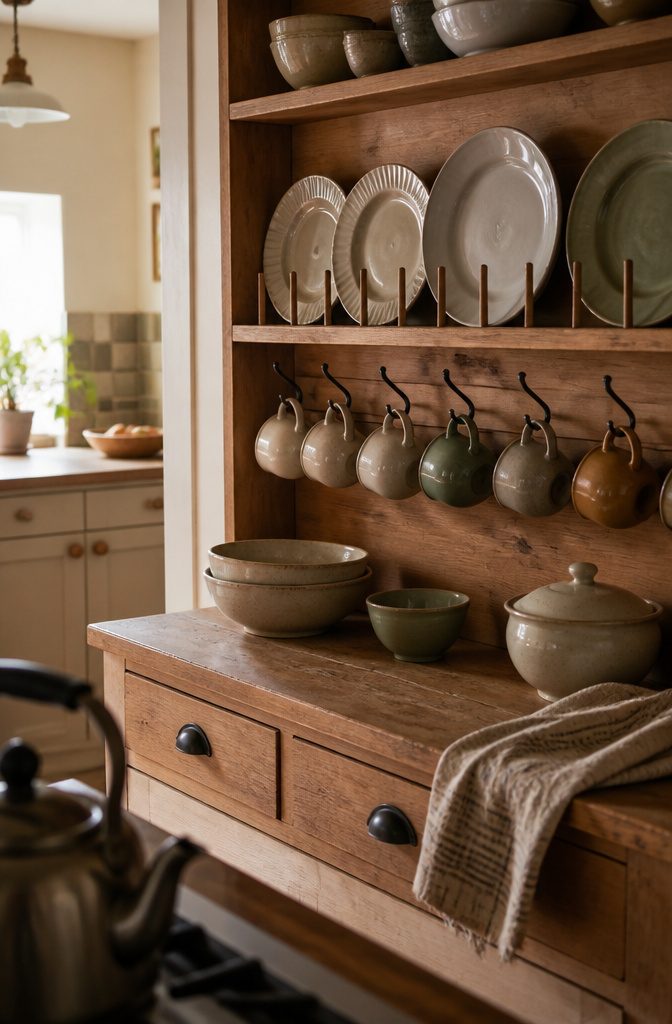
Hooks turn the inside of a hutch door or the underside of a shelf into useful space for mugs and teacups, and the same trick works on the side panel if the hutch sits away from the wall.
Plate holders hung on the back wall let you stand plates upright where they’d otherwise lean or lie flat, which opens up the shelf in front of them for bowls or serving pieces.
I find the combination works best when the hooks go low — eye level or below — so you can lift a mug off without reaching past the shelf above it.
The plate holders sit higher, filling the back wall where taller pieces would block the view. Screws hold both in place, so you’re marking the wood, but you gain storage that doesn’t eat into your usable shelf depth.
If the hutch back is particleboard rather than solid wood, check that the screws bite into something that won’t pull out under the weight of stoneware.
Frequently Asked Questions
How can I arrange items in my dining room hutch?
Start by varying heights and textures across every shelf, using stacks, leaning plates, and taller items at the back to create layers.
Distribute larger and smaller pieces across different levels instead of clustering them all in one area, then step back and adjust until the whole hutch reads as one display rather than individual shelves.
What is the 3-5-7 rule in decorating?
The rule refers to grouping items in odd numbers (3, 5, 7) rather than even ones, which makes arrangements look more intentional and less rigid.
Three bowls on one side or five plates on the other read as arranged rather than just lined up.
How do I make a hutch look modern?
Swap dated hardware for simple matte black or brushed nickel pulls, and repaint the hutch in a color that ties into your existing palette.
Keep the interior a contrasting tone if you have open shelving, since that backdrop makes your display pop more than matching paint would.
What should I put on top of my hutch?
Use the top for larger items that would crowd the shelves, like a tall vase with branches, a framed landscape, or a pottery piece that means something to you.
Extend the display upward without blocking the view of what sits on the shelves below.
Are hutches still in style?
Hutches remain practical when styled with intention rather than treated as storage overflow. A well-arranged hutch that mixes functional dishes with personal pieces looks collected over time, which keeps it from reading as dated.